A ceiling stain rarely appears at a convenient time. It shows up after a night of hard rain, during a viewing before exchange, or on a Sunday when every roofer seems unreachable. The difficult part isn't only the water. It's the uncertainty. Is it a failed tile, cracked flashing, blocked guttering, a flat roof issue, or condensation pretending to be a leak?
Most homeowners start by looking straight at the stain. That's understandable, but it's also where people lose time. Water often enters in one place, travels along timbers or felt, then appears somewhere else entirely. Good roof leak detection is less about panic and more about sequence. Check safety, gather internal clues, inspect externally without taking risks, and know when a proper survey is no longer optional.
Table of Contents
- Read the room before you read the roof
- What to look for in the loft
- When inside clues point to a wider defect
- What you can assess safely from the ground
- The roof features that fail most often
- Flat roofs need a different mindset
- Build a record before anyone starts repairs
- The point where DIY stops being sensible
- What professional involvement helps you avoid
That Telltale Stain What to Do First
The first job is simple. Don't assume the mark on the ceiling is the source. Treat it as evidence, not a diagnosis. Put a bucket down if water is active, move valuables clear, and note whether the leak appears only during rain, after prolonged wet weather, or even in dry conditions. That pattern matters.
A fresh leak usually leaves sharper edges and feels cool or damp to the touch. An older issue often shows tide marks, flaky paint, a musty smell, or discoloured plaster that has dried and been re-wet more than once. If the stain sits below a chimney breast, valley, dormer cheek, or rooflight, those roof features move higher up your suspect list. If it appears in a bathroom top floor ceiling or near poorly ventilated corners, condensation remains a contender.
Practical rule: The more specific your observations are at the start, the less money you waste on the wrong repair later.
Homeowners often search online for quick pointers on how to identify roof leaks, and that can help with the broad signs. True value comes from combining those signs with the building's layout, roof form, and weather exposure. A detached house on an open site behaves differently from a mid-terrace with a party wall parapet.
If you're a buyer or landlord, stay disciplined. One stain doesn't always mean widespread failure, but neither should it be dismissed as “just cosmetic”. Water ingress can remain localised for a long time, then become expensive very quickly once timbers, insulation, plasterboard or electrics are affected.
Safety First and Preparing for Your Inspection
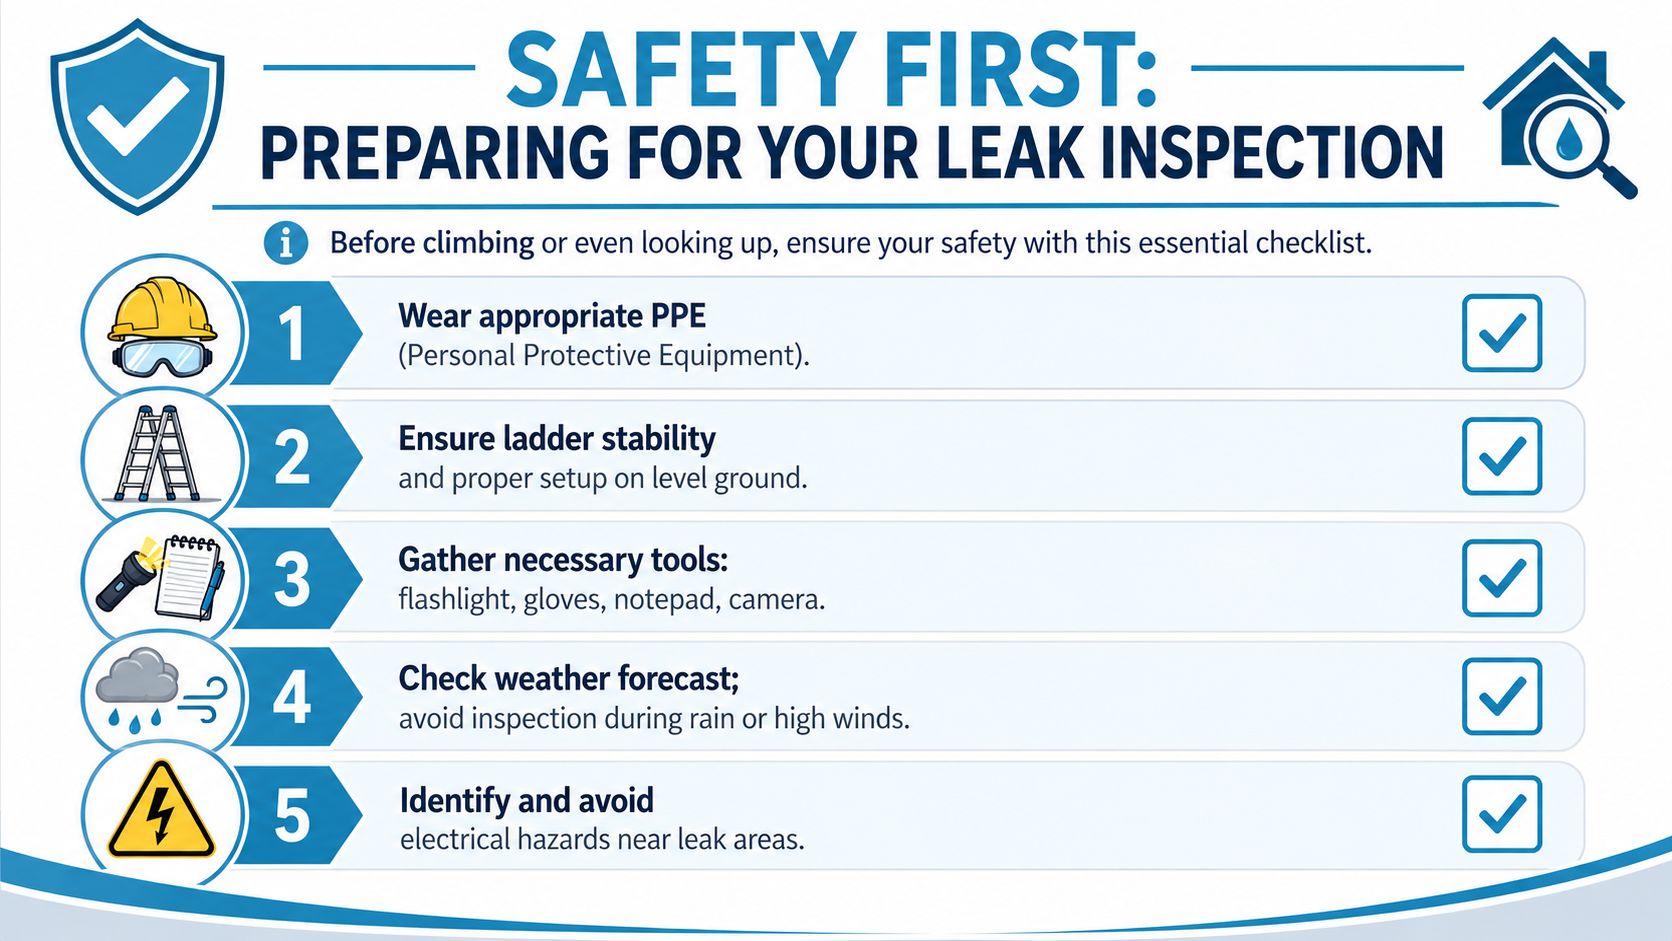
Start with the risks, not the roof
Before climbing anywhere, decide whether you should inspect at all. A wet pitched roof, fragile flat roof covering, icy eaves, or gusty conditions are enough reason to stay on the ground. Most useful observations can be made internally, from a loft hatch, from garden level with binoculars, or from a ladder that you use only as a viewing point rather than a route onto the roof.
Ladder safety is not a formality. Place it on firm, level ground. Secure it if possible. Keep three points of contact when ascending or descending, and don't carry loose tools in your hands. If you can't position the ladder squarely and safely, stop there. A slipped tile is repairable. A fall is not.
Electrical risk gets underestimated, especially in lofts. Water can track along cables, light fittings and junctions. If you can see active dripping near wiring, recessed lights, extractor fans or consumer unit routes, isolate the affected circuit if you know how to do so safely. If you don't, leave it alone and call an electrician or surveyor before pushing further.
What to take with you
You don't need a van full of equipment for a first pass. You do need enough to inspect methodically and record what you find.
- Torch: A powerful torch is better than relying on loft bulbs or your phone.
- Gloves: Insulation, nails and rough timbers make bare hands a poor choice.
- Camera or phone: Take clear, well-lit photographs from more than one angle.
- Binoculars: Ground-level inspection is far safer and often more revealing than people expect.
- Notebook: Record date, weather, room location and any active dripping.
- Old clothes and a dust mask: Loft spaces can be dirty, cramped and irritating to lungs and skin.
Don't step onto insulation between joists in a loft unless you know exactly where the ceiling joists are. One wrong foot can put you through the plasterboard below.
Preparation also means timing. Inspect after the area has shown signs of leaking, but only when conditions are safe. A dry day after recent rain is often the best compromise. You'll have a better chance of spotting clues without adding danger.
The Internal Hunt Finding Clues Inside Your Home
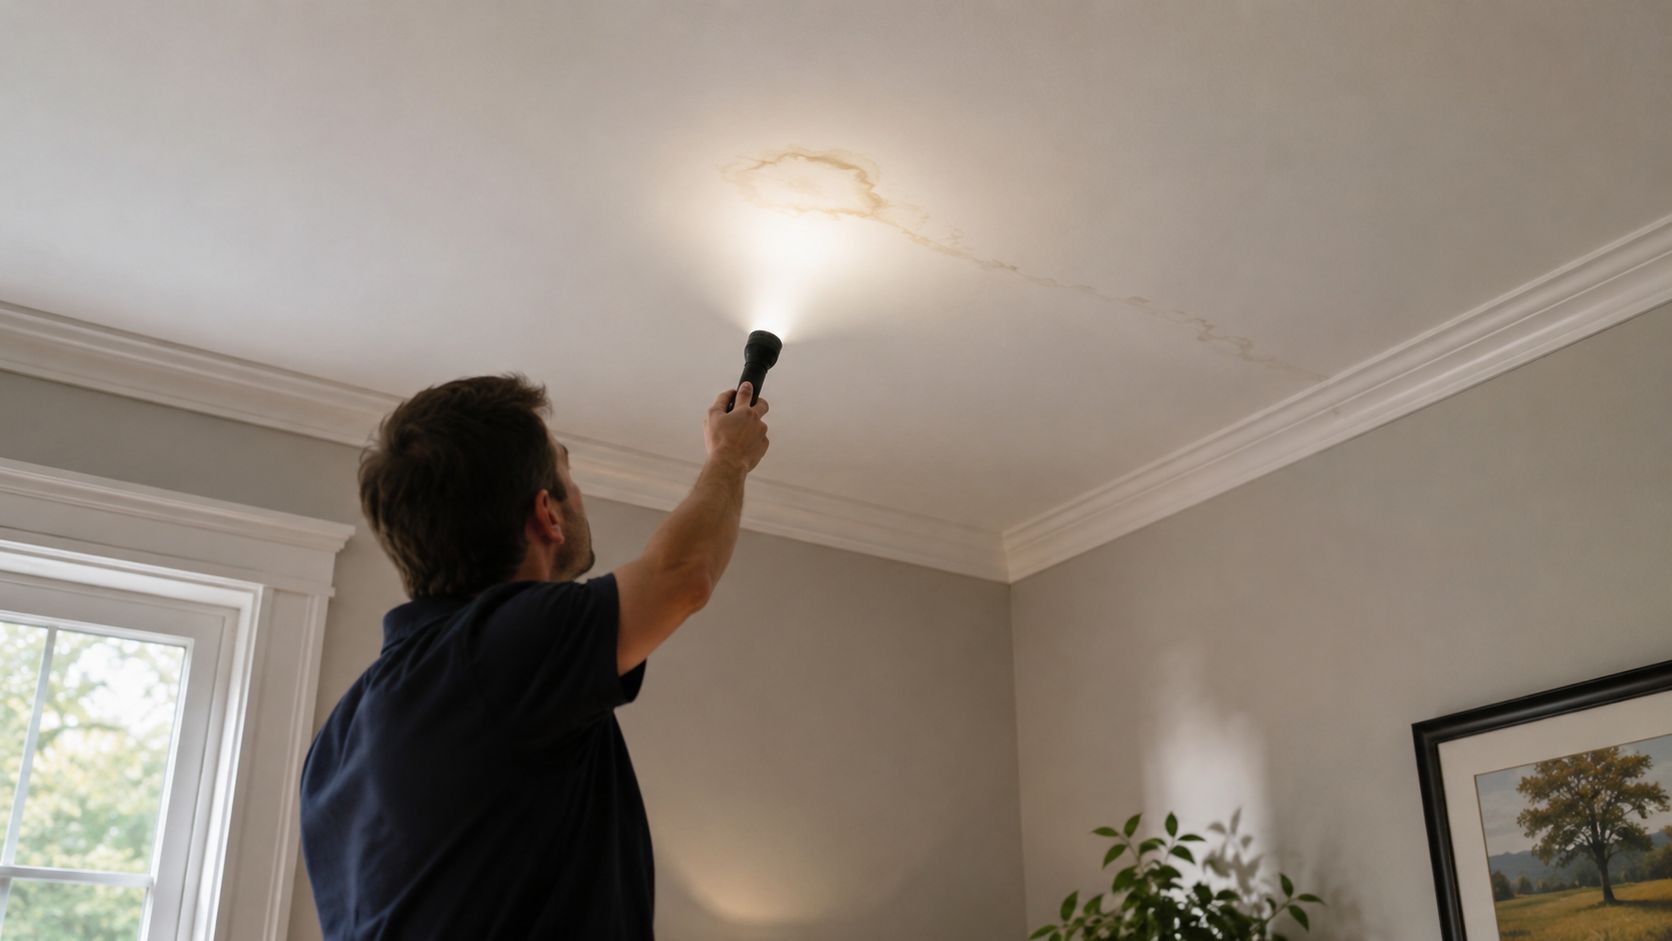
Read the room before you read the roof
Internal inspection is where many leaks become understandable. Start below the stain and work outward. Don't only look at the obvious patch. Check ceiling corners, the tops of walls, chimney breasts, window heads on upper floors, and any area where paint is bubbling or wallpaper is lifting.
Your nose helps here. A stale, musty smell often appears before obvious staining, especially where insulation has been damp for some time. So does a subtle softness in plasterboard. Press gently. If the surface feels swollen or slightly springy, moisture may have been present for longer than you thought.
Water rarely falls in a straight vertical line from the entry point. It runs along rafters, under felt laps, across the tops of plasterboard, and around fixings before finally dripping. That's why the centre of the stain often tells you less than the edges and the route above it.
For temporary containment only, some homeowners look up methods to fix a leaking roof from the inside. That sort of stop-gap can reduce immediate damage in a pinch, but it doesn't replace diagnosis. Internal patching can hide symptoms while the roof defect continues.
What to look for in the loft
Once in the loft, slow down and let your eyes adjust. Use the torch across surfaces at a low angle. Damp marks often show better that way than with direct light.
Look for these clues:
- Darkened rafters or sarking felt: Fresh moisture often gives timber a deeper, patchy tone.
- Compressed or matted insulation: Wet insulation loses loft and can show localised discolouration.
- Rust on nails or nail tips: Condensation can do this too, but a concentrated pattern near one slope can point to ingress.
- Daylight through the roof covering: Tiny points around fixings may be normal on older roofs, but larger openings are not.
- Tracks on dust: In older lofts, water sometimes leaves a visible path through settled dust.
A useful habit is to stand back and trace the likely line of travel rather than fixating on one wet patch. If the loft space is boarded, lift access panels carefully where possible. Moisture often hides under boards and beside insulation rolls.
When inside clues point to a wider defect
Some signs suggest you're not dealing with a single failed tile. Repeated staining in more than one room, mould growth near cold roof edges, or damp around junctions such as valleys and parapets can indicate a more systemic issue. Poor ventilation, aged underlay, failed flashings, or design weaknesses may all be in play.
A specialist report can help sort out whether the problem is roof failure, penetrating damp, condensation, or a combination. For broader defect context, Survey Merchant property reports explain the sort of evidence professionals use when damp patterns are unclear.
If the leak path doesn't make sense from the room below, the loft is usually where the story starts to become coherent.
External Inspection Tracking the Leak to Its Source
A careful outside inspection should confirm or challenge what you found indoors. It shouldn't become a balancing act on a slippery roof. Start from the pavement, garden or driveway and scan the whole roof slope before focusing on one detail.
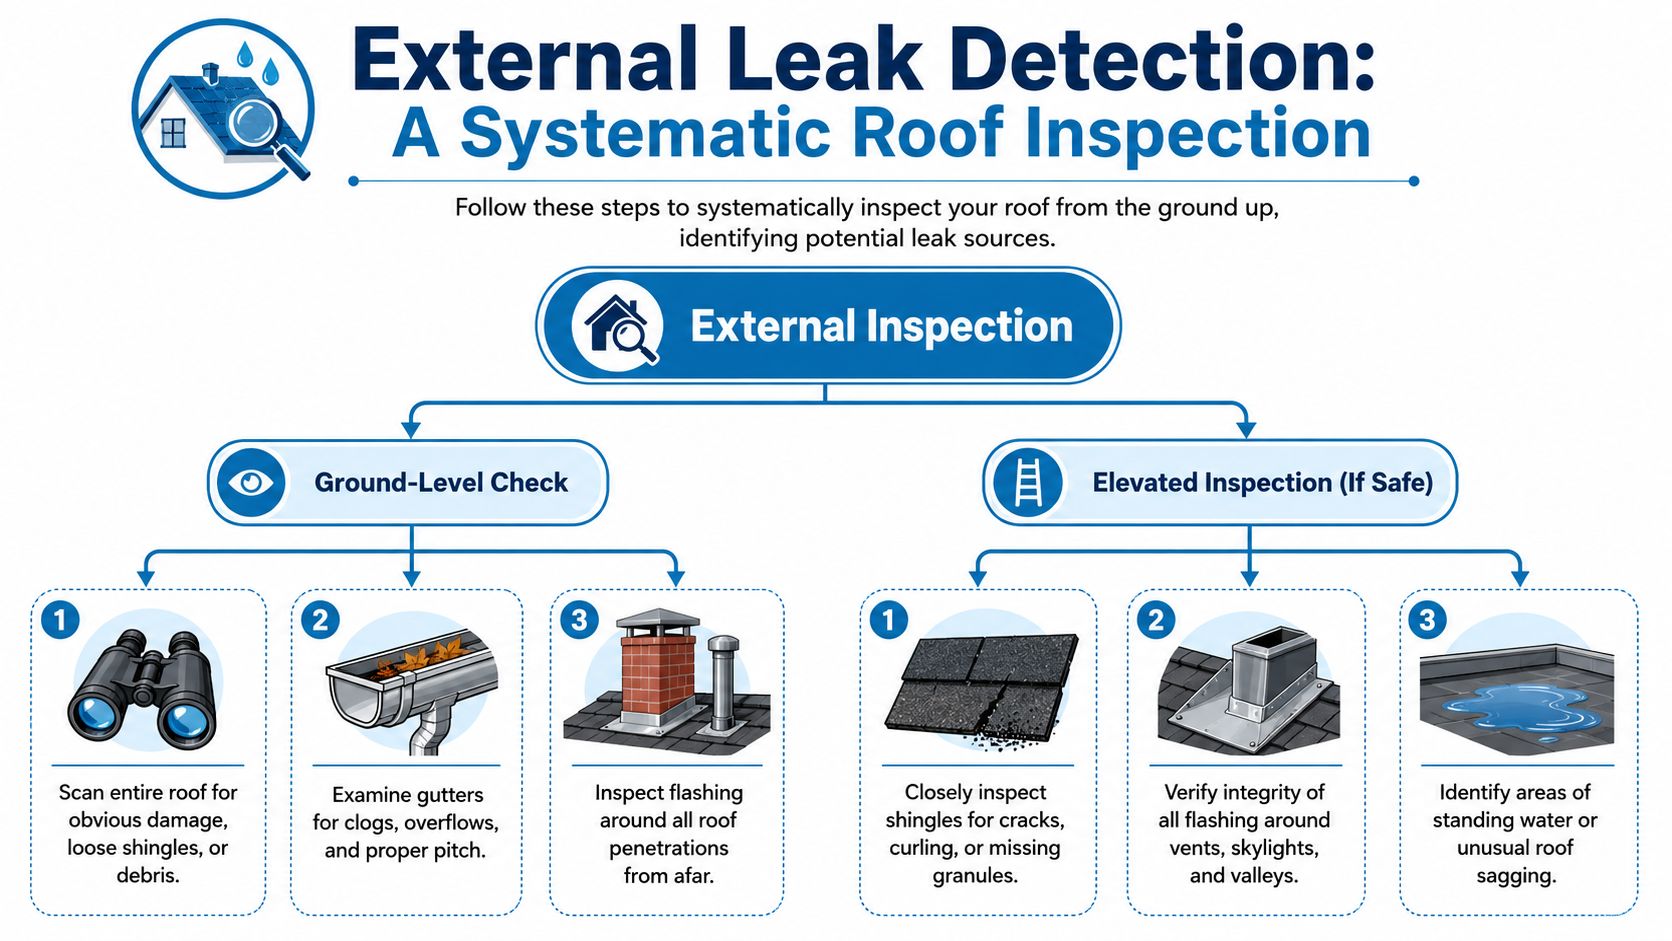
What you can assess safely from the ground
Binoculars are underrated for roof leak detection. From ground level, you can often identify slipped slates, cracked tiles, uneven ridge lines, defective flashing lines, sagging gutters and vegetation build-up in valleys.
Check the gutters while you're there. Overflow staining on walls, green growth below eaves, and water marks on fascia boards can indicate blocked or poorly pitched guttering rather than a primary roof covering defect. It still causes internal damp, but the remedy may be quite different.
For hard-to-see roof forms, especially taller properties or extensions hidden behind parapets, it often makes sense to find qualified drone roof surveyors. A drone won't diagnose everything by itself, but it can provide safe access to areas a homeowner cannot inspect properly.
This short video gives a practical overview of the sort of defects worth watching for during an external check.
The roof features that fail most often
Roofs usually leak at joints, changes in direction, and penetrations. Large uninterrupted fields of tile or slate are often less troublesome than the details around them.
| Leak Source | Common Signs | DIY Spotting Difficulty |
|---|---|---|
| Chimney flashing | Gaps, lifted lead, staining around chimney breast | Medium |
| Valleys | Debris build-up, overflowing in rain, concentrated staining below | Medium |
| Slipped or cracked tiles/slates | Visible displacement, broken edges, localised ingress after wind-driven rain | Easy to Medium |
| Rooflights or skylights | Damp at reveals, failed seals, staining at corners | Medium |
| Vent pipe flashings | Perished collars, damp near bathrooms or service risers | Medium |
| Flat roof outlets and upstands | Ponding, blisters, edge failure, leaks near internal corners | Hard |
Specific checks help:
- Chimneys: Look at lead flashing where it meets brickwork. Failed pointing can also admit water.
- Valleys: Leaves and moss can trap water and slow discharge. Overflow then shows inside lower down.
- Abutments: Roofs meeting walls often fail where flashing or secret gutters have been poorly detailed.
- Rooflights: The frame-to-roof junction is more vulnerable than the glazing itself.
- Ridges and hips: Mortar failure or displaced units can let wind-driven rain underneath.
Flat roofs need a different mindset
Flat roofs are where confident DIY diagnosis often goes wrong. The visible split or blister isn't always the true entry point, and internal moisture can spread widely beneath coverings and insulation. The bigger trap is confusing a leak with condensation, especially in roofs over kitchens, bathrooms, utility areas, or poorly ventilated extensions.
According to Vector Projects' summary of UK flat roof detection issues, incorrect diagnosis leads to 45% of flat roof repairs being misdirected, and that challenge is made harder by a 32% increase in high-intensity winter rainfall in the South East as of 2025. In practice, that means more homeowners see moisture and assume the membrane has failed when the problem may involve humidity, cold bridging, or trapped condensation within the roof build-up.
That doesn't mean flat roofs are impossible to assess visually. It means you should be cautious about conclusions. Standing water, open laps, edge defects, failed upstands and cracking all matter. So do internal moisture patterns, room use and ventilation history. If those clues conflict, visual inspection has reached its limit.
Advanced Detection Tools and When to Use Them
When sight alone doesn't settle the question, tools can help. They don't remove the need for judgement. They just improve the quality of evidence.
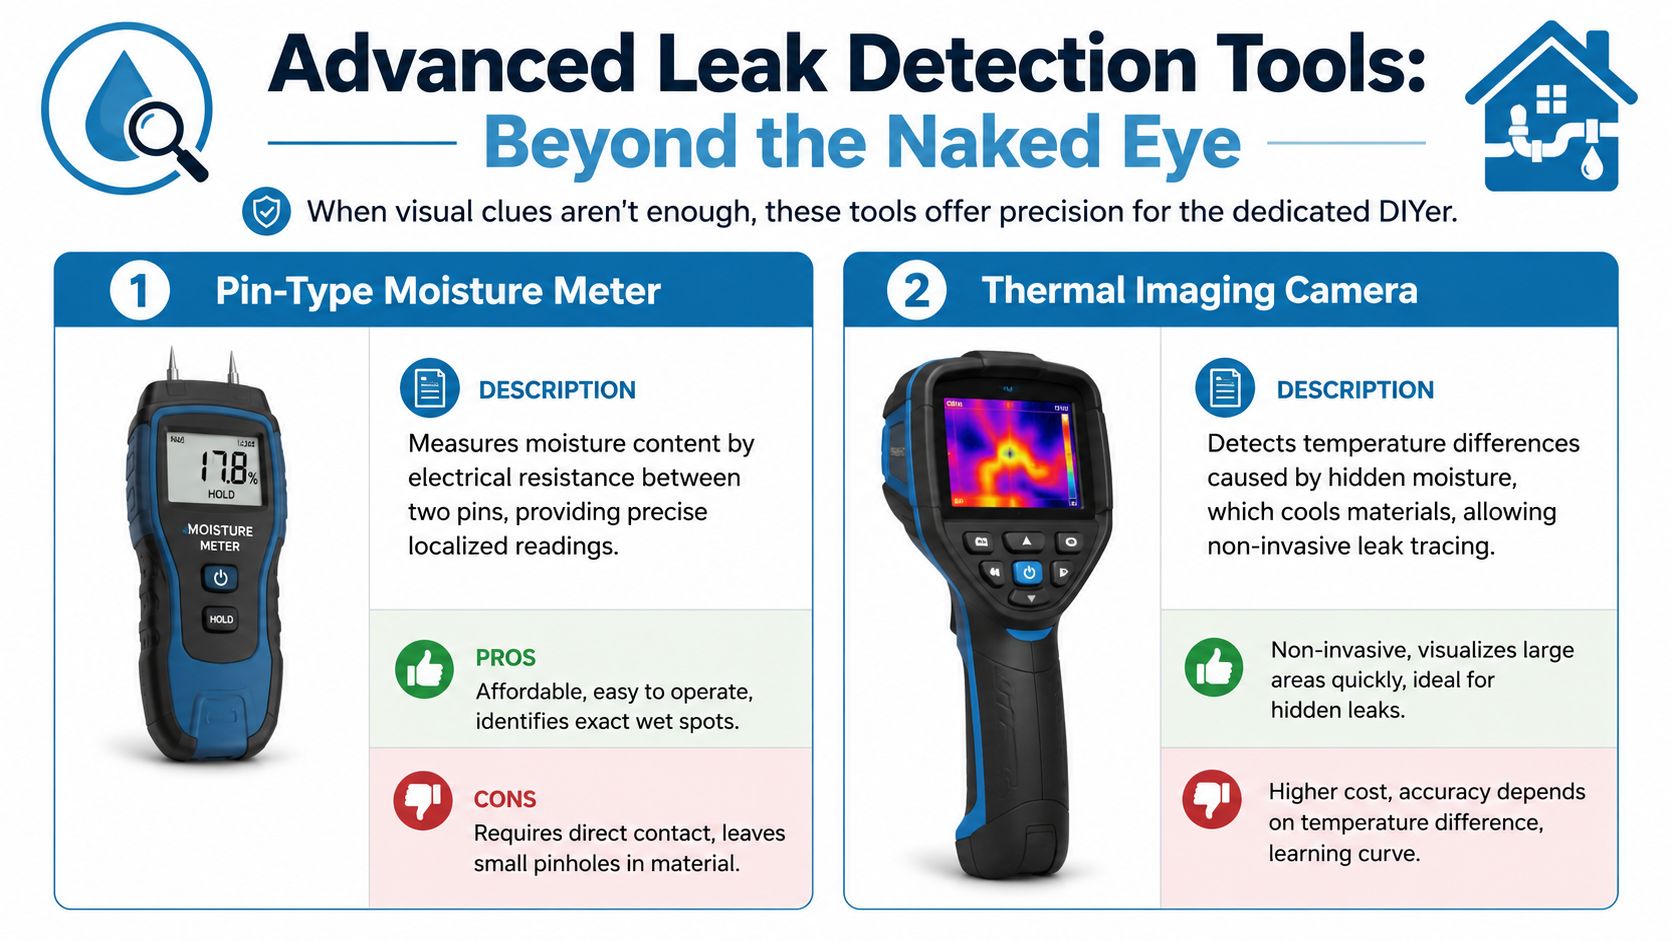
What DIY tools can and can't tell you
A pin-type moisture meter is one of the more useful homeowner tools. It gives a localised reading by contact and can help compare a suspect area with a dry control area nearby. It's good for confirming that a stain is still damp, checking skirting or plasterboard edges, and building a pattern across one wall or ceiling.
A pinless moisture meter scans more broadly and avoids pinholes, but readings can be affected by material density and hidden fixings. Both types are best used comparatively rather than as stand-alone proof. If one patch reads materially different from surrounding areas, that's useful. If every reading seems inconsistent, the interpretation may be the problem rather than the building.
Thermal imaging is appealing because it can show colder areas associated with moisture. Used properly, it's excellent for tracing spread, especially behind finishes. Used poorly, it's a shortcut to false confidence. Cold spots can reflect insulation gaps, thermal bridging, recent weather changes, or ventilation effects rather than active roof leaks.
Thermal images don't diagnose causes. They show temperature differences that still need interpretation on site.
Where professional methods earn their fee
For inaccessible roofs, repeated failed repairs, or flat roofing systems, professional methods become far more persuasive. Drones improve access and photography. Thermal imaging improves pattern recognition. Electronic leak detection improves precision where a membrane system is involved.
One detailed UK guide to electronic leak detection describes a process using visual inspection first, then low-voltage testing across the membrane, followed by precision probing to locate defects. It reports a success rate exceeding 95% in controlled UK trials and notes that condensation accounts for 30% of false positives in non-specialist investigations. That matters because many homeowners pay for repairs to the wrong area when the issue was never properly verified.
There's also a wider shift towards monitoring technology. Future Market Insights reports that smart detectors are projected to hold 61.7% of the UK water leak detection market share in 2026, and that the global roof water leak detector market is projected to grow from USD 3.4 billion in 2026 to USD 6.6 billion by 2036. For homeowners, the point isn't the market forecast itself. It's that real-time monitoring and early warning tools are becoming more normal, especially where leaks would be costly to miss.
If you want a clearer picture of what thermal surveys can and can't show in building diagnostics, Survey Merchant's thermal imaging information is a sensible starting point.
Documenting Findings and When to Call a Surveyor
A leak investigation becomes far easier when the evidence is organised. The typical initial response involves taking one photograph of a stain and then calling contractors. That's rarely enough. You want a record that shows location, extent, timing and likely route.
Build a record before anyone starts repairs
Photograph the affected room wide, then medium, then close. Do the same in the loft and outside if visible from the ground. Include reference points such as chimney breasts, windows, hatch positions, or rooflight locations so the images make sense later.
Your notes should include:
- Date and weather: Was it after heavy rain, wind-driven rain, or a dry spell?
- Room and position: Front bedroom, rear extension, side of chimney breast, and so on.
- Behaviour of the defect: Active drip, spreading stain, intermittent mark, musty odour only.
- Previous works: Any recent repointing, roof patching, gutter cleaning, or loft insulation changes.
Temporary protection has its place. A tarpaulin, water collection, and moving contents clear can reduce immediate harm. Just don't mistake mitigation for repair. Covering a roof defect without understanding it can divert water somewhere harder to see.
The point where DIY stops being sensible
There are clear trigger points where a professional survey is the right call.
- The roof is inaccessible or unsafe: Height, fragility, steep pitch, conservatory below, or limited access.
- The leak path is confusing: Internal staining doesn't align neatly with an obvious external defect.
- The property is being bought or sold: Informal guesswork is poor protection when liability may follow.
- Flat roofing is involved: Especially where condensation and penetration both remain plausible.
- Repairs have already failed: Repeating the same patch usually means the diagnosis was wrong.
- There may be legal or insurance implications: Documentation quality then matters far more.
One reason to escalate early is cost control. Checkatrade's water leak detection cost guide states that in the UK, the average cost to detect a water leak through standard methods ranges from £80 to £1,600, with an average price of £500. The same guide notes method-specific ranges, including £150 to £1,000 for infrared camera water leak detection, £1,000 to £1,500 for acoustic device detection, and £250 to £2,000 for tracer gas detection. It also states that repairing the main water service line after detection can cost between £330 and £1,500, with hourly labour rates between £50 and £170 excluding materials. Those figures aren't roof-only pricing, but they are a useful reminder that wrong turns in diagnosis can become expensive.
What professional involvement helps you avoid
A proper survey isn't only about finding a hole. It's about reducing the risk of the wrong conclusion. That matters particularly in purchase scenarios, where hidden leaks may be missed by basic visual inspection. The practical problem is simple. A surveyor or homeowner can only report what they can reasonably see, and some defects sit behind beams, in blind corners, or along inaccessible roof geometry.
A widely discussed UK example on Reddit's LegalAdviceUK forum highlights how photographic angle limitations can hide a leak that becomes obvious only from a different viewpoint. Cases like that are why clear follow-up investigation matters when warning signs exist but visibility is poor.
Even if you're reading guidance from outside the UK, some explanations of concealed leaks are still useful. For example, this piece on hidden water leak detection in Las Vegas is a reminder that hidden moisture often travels before it reveals itself, and that surface symptoms can be misleading wherever the property is.
If your leak involves a flat roof, repeated recurrence, uncertain liability, or a live property transaction, don't rely on patch-and-hope. Commissioning the right survey early is usually cheaper than paying several trades to chase the wrong cause.
If you need help finding the right surveying professional for a roof leak problem, Survey Merchant connects homeowners, buyers and landlords with qualified UK surveyors for roof inspections, defect reports, thermal imaging, drone surveys and broader building advice. It's a practical route when you need impartial guidance, not guesswork.