Building Surveying
Sep 4, 2026
Checklist: Pre-Purchase Surveys vs Post-Purchase Inspections
Checklist comparing pre-purchase surveys and post-purchase inspections: timing, scope, costs and key checks pre- and post-completion.

If I had to put it in one line: a pre-purchase survey helps me decide whether to buy, and a post-purchase inspection helps me sort out what needs fixing after I own the place.
Before exchange, I use a survey to check for things like damp, roof trouble, movement, and old services. After completion, I use an inspection to log faults, test windows, doors, sockets, heating, drainage, and, with a new-build, snagging items. The timing matters because before exchange I may still renegotiate or pull out, but after completion I’m mostly dealing with repairs, warranty claims, or a maintenance list.
Here’s the short version:
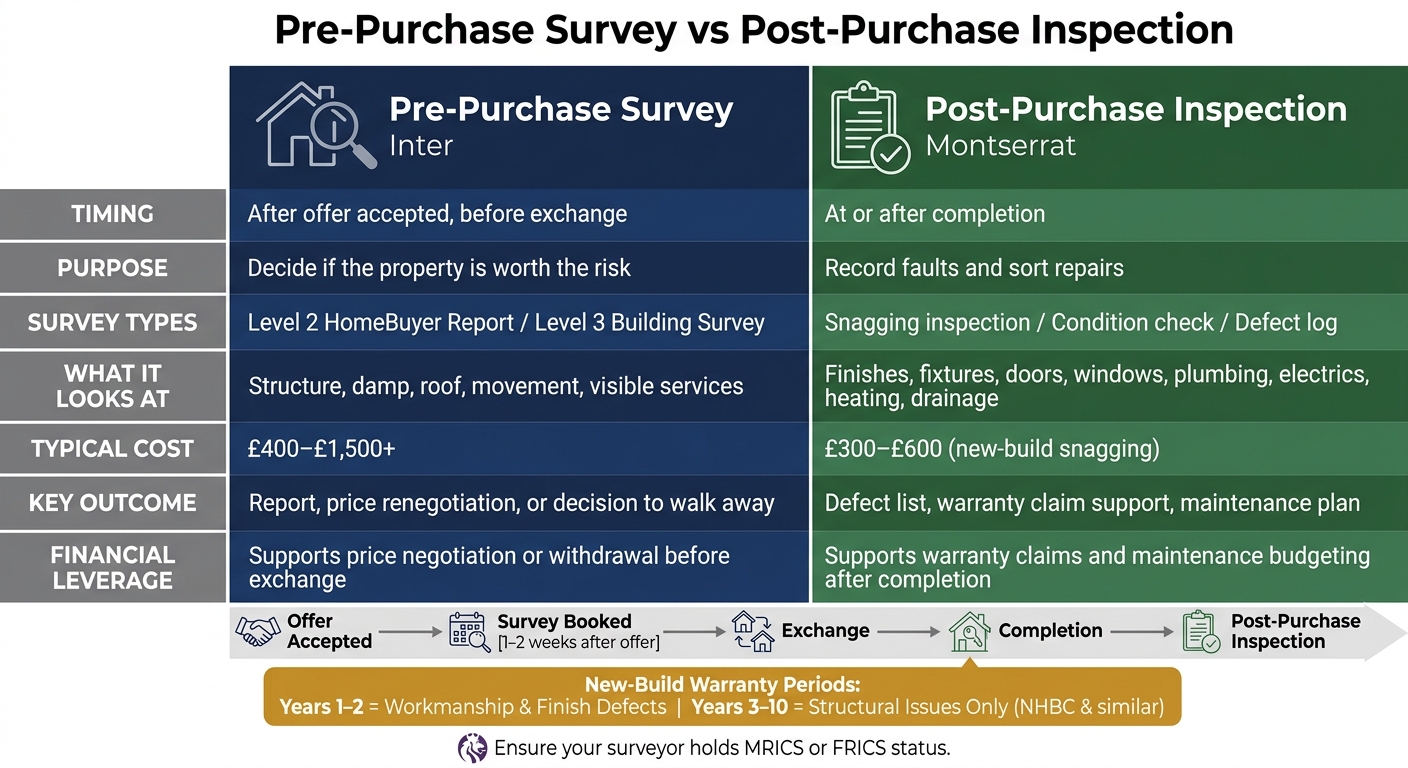
Pre-Purchase Survey vs Post-Purchase Inspection: UK Buyer's Visual Guide
| Check | When I do it | What it’s for | What it looks at | Main outcome |
|---|---|---|---|---|
| Pre-purchase survey | Before exchange | Decide if the property is worth the risk | Structure, damp, roof, movement, visible services | Report, repair warnings, price talks, or walking away |
| Post-purchase inspection | At or after completion | Record faults and sort repairs | Snagging, finishes, fixtures, heating, electrics, drainage | Defect list, warranty claim support, maintenance plan |
Bottom line: if I want to avoid buying a problem, I get the survey first. If I want a clean record of faults after I move in, I do the inspection next.
Use this checklist to see what a pre-purchase survey usually covers, and what you need to sort before the visit.
Externally, the surveyor will inspect roof coverings, including tiles, slates, flashings, ridges and valleys. They will also look at chimneys, gutters, downpipes, external walls, windows, doors, paths, drives, visible drainage and visible boundaries. The main aim is to spot deterioration, water ingress and defects that could cost a lot to put right.
Internally, the survey covers ceilings, walls, floors, loft spaces where it is safe to get in, bathrooms, kitchens, and signs of damp or structural movement. In loft areas, the surveyor will also note insulation and ventilation where these can be seen. Crack patterns, sloping floors and misaligned door frames can all point to what may be going on with the structure.
Visible services - heating, plumbing, electrics and ventilation - are checked by sight only. The surveyor may note the age and apparent condition of the boiler, consumer unit and pipework, but they will not test how they perform. If something looks old, unsafe or questionable, the report will usually suggest bringing in a specialist, such as a Gas Safe engineer for the boiler or an NICEIC-registered electrician for the wiring.
Both Level 2 and Level 3 reports often use a traffic-light condition rating system (Ratings 1 to 3), so you can scan the main issues fast: green means no action needed, amber points to defects that need attention, and red marks serious or urgent problems. The table below shows where the two survey types split:
| Feature | Level 2 HomeBuyer Report | Level 3 Building Survey |
|---|---|---|
| Best for | Conventional, standard construction | Older, altered or non-standard homes |
| Inspection depth | Detailed visual, non-invasive | Thorough, more diagnostic where accessible |
| Reporting style | Structured ratings with practical advice | Narrative analysis of causes and repairs |
| Best suited to | Relatively modern, straightforward homes | Older, heavily altered, listed or non-standard properties |
Getting the right survey starts well before the surveyor turns up. A bit of prep now can save hassle later.
After completion, the focus shifts from purchase risk to recording defects and arranging any follow-up checks.
After completion, a post-purchase inspection helps you log defects, unfinished work and safety faults. It is not the same as a survey. A survey looks at the property before purchase; this is a practical check of what’s wrong, what’s missing and what still needs fixing.
Keep your survey report close by and use it as a reference point. Then check what still needs attention after completion.
Start outside before you go in. Look at the brickwork and render for cracks, hollow spots or staining. Check the roof slopes for slipped or missing tiles, badly fitted flashings and incomplete ridge or verge details, which often show up on new-build homes. Scan the gutters and downpipes for sagging, leaking joints and poor falls. Paths and driveways should slope away from the building and should not leave standing water. If it’s safe, lift any accessible inspection covers and look for standing water or debris in the drainage runs. Also check that leftover building materials, spare mortar and packaging have been removed from the site.
Inside, this is the snagging stage for new-builds. In a resale home, it’s more of a condition check once you’ve moved in. Go room by room in the same order each time: ceiling, walls, skirting, floor, windows, doors and fixtures. Open and close every window and door. Test every lock. On upper floors, make sure windows have restrictors in place.
Common snagging issues in new-builds include:
In bathrooms, en-suites and kitchens, check tiles for chipped edges and poor grout. Look closely at silicone sealant around baths, showers, basins and worktops. Open every kitchen cupboard and drawer. Make sure worktop cut-outs are sealed, and confirm that integrated appliances are fitted and working. Run taps and showers for long enough to check water pressure, drainage and any leaks around traps or overflows.
For services, test the boiler in both heating and hot water modes. Check that all radiators heat up evenly. Plug in a phone charger or lamp at every socket to make sure it’s live and secure. Turn on every light fitting and extractor fan. A simple trick is to hold a tissue near the extractor grille to see if it pulls air. For new-builds, keep the EIC, gas commissioning records and appliance manuals with your inspection notes.
Use a pass/fail list for each room and each elevation. It keeps things tidy and makes follow-up much easier.
Each defect should have its own number, a plain description, an exact location and a dated photo. For example: "Defect 07 - 12-08-2026 - Bedroom 1, north wall: hairline crack, 3 mm wide, 200 mm long." Stick to what you can see. Don’t guess the cause. That might sound picky, but it can save arguments later.
Store photos in folders by date (DD-MM-YYYY) and room. Name each file with the defect number so you can find it fast when you pull the list together.
For new-build buyers, the first two years after completion are the main period for reporting workmanship and finish defects to the developer under the defects liability period. Years 3–10 of most structural warranties, including those from the NHBC, usually cover structural issues only. [1][2][3]
Put your defect log into one PDF or spreadsheet and send it to the developer’s customer care team as a single organised document. Keep your NHBC or other warranty papers, appliance manuals, the developer’s schedule of finishes and your compliance certificates together as part of the inspection record.
Next, compare these checks with the pre-purchase survey to see what has changed after completion.
Once you've logged defects, it helps to put both checks next to each other.
This checklist gives you a quick, side-by-side view.
Read across each row to compare timing, scope and outcome.
| Category | Pre-Purchase Survey (Level 2 / Level 3) | Post-Purchase Inspection (Snagging / Maintenance) |
|---|---|---|
| Timing | After offer accepted, before exchange | At or after completion |
| Purpose | Risk assessment and purchase decision | Quality control and defect remediation |
| Scope | Structure, damp, roof, movement, services overview | Cosmetic finishes, workmanship, fixtures, usability |
| Report style | Formal RICS report with condition ratings | Snagging list or maintenance log |
| Typical defects | Subsidence, damp, roof defects, non-standard build | Uneven plaster, sticking doors, missing sealant, faulty sockets |
| Financial impact | Supports price negotiation or withdrawal | Supports warranty claims and maintenance budgeting |
| Best use case | Older, altered or structurally suspect properties | New builds, cosmetic issues and early maintenance tracking |
Scope matters just as much as timing. A survey looks at structural soundness and major risk across the whole property. A post-purchase inspection is more about workmanship and day-to-day use - the sort of things you notice only after living there, like a radiator with a cold spot or a shower tray that drains slowly.
A pre-purchase survey makes sense when there are signs of structural or system-related risk before exchange. That can include:
For these properties, a Level 3 Building Survey is usually the right fit. It goes further than surface-level defects. It can comment on hidden issues, the expected lifespan of main building parts, and likely repair routes - the sort of detail that's useful before you're legally tied in.
A post-purchase inspection fits better once the big structural questions are already settled. Then the focus moves to cosmetic defects, missing fixtures, and building up a maintenance log instead of checking structural risk.
Use this checklist to pull together the right paperwork and set a budget for the stage you’re at.
Before the survey, have these ready:
After completion, keep the paperwork that may support defect claims:
Costs depend on the type of survey and the property itself:
These costs are separate from any follow-up checks a surveyor may suggest, such as a structural engineer’s report or a damp inspection.
For impartial survey booking, Survey Merchant connects buyers and owners with nationwide RICS-regulated surveyors for Level 2 HomeBuyer Reports, Level 3 Building Surveys and Red Book valuations.
Pre-purchase surveys help cut risk before exchange. Post-purchase inspections create a record of defects after completion. Keep your documents, photos and correspondence in one place so nothing slips through the cracks.
Choose Level 1 if you're buying a newer, fairly standard property and nothing obvious looks wrong.
Choose Level 2 for most post-1900 homes that seem to be in decent condition.
Choose Level 3 for properties that are older, unusual, non-standard, listed, heavily altered or in poor shape. It also makes sense if you can already spot warning signs, such as cracking, damp, sloping floors, roof distortion or bulging walls.
Yes. A survey can miss hidden defects because it is a visual, non-invasive inspection.
A surveyor can’t lift fitted carpets, move heavy furniture, or open up walls. So if a problem is tucked away behind coverings or sits in an area they can’t reach, it may not be spotted.
If access is blocked, that should be noted in the report so you can look into it further.
For a new-build home, book a snagging inspection at or before completion. That gives you the best chance to log cosmetic issues and poor workmanship while you still have the most leverage with the developer.
It also helps to arrange a second inspection 21 to 23 months after completion. The aim is to spot latent defects before your two-year warranty runs out. If you can, book the inspection in daylight and make sure all utilities are switched on.
Survey Merchant provides vetted RICS surveyors across 100+ UK locations at fixed fees:
→ Level 2 Home Survey (HomeBuyer Report)
→ Level 3 Building Survey (full structural survey)
→ RICS Red Book property valuations
→ Party wall surveyors — notices, awards & schedules of condition
→ Expert witness surveyors — CPR Part 35 reports for property disputes