Leasehold
Apr 30, 2026
How to Identify Energy Deficiencies in a Survey
Learn how surveys identify heat loss, insulation gaps, inefficient boilers and air leaks using thermography, blower-door tes
Energy deficiencies in properties lead to higher energy use and costs. These issues include poor insulation, outdated heating systems, and air leaks. Surveys identify these problems to help improve energy efficiency, lower bills, and increase property value. Key tools like Energy Performance Certificates (EPCs), thermographic imaging, and blower door tests are used to assess heat loss, insulation, and ventilation. Here's what you need to know:
Understanding your survey report is crucial for prioritising upgrades, reducing energy costs, and meeting legal standards for rental properties.
Energy Loss Sources and Costs in UK Homes: Key Statistics
When professionals assess a property's energy efficiency, they focus on specific areas where heat is most likely to escape. By pinpointing these zones, property owners can understand where improvements will make the biggest difference to both comfort and energy bills. Surveyors thoroughly examine these areas, laying the groundwork for the energy loss measurements that follow.
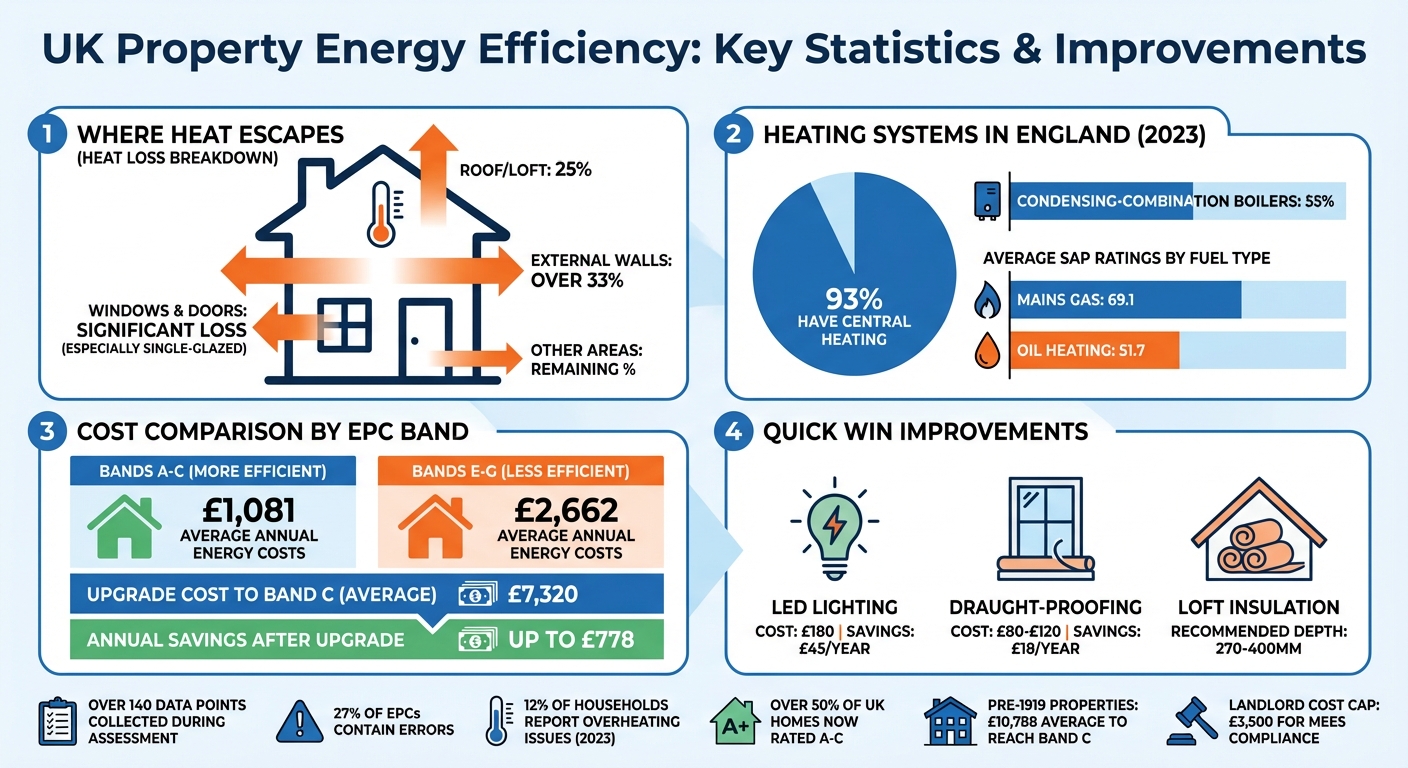
The roof is often the main culprit for heat loss in homes - around 25% of a property's heat can escape through an uninsulated roof or loft space [9]. Surveyors check the depth of loft insulation, ensuring it meets the recommended minimum of 270mm, with 300mm being typical and up to 400mm for maximum effectiveness. They also look for signs of mould, damp, or compression, as well as gaps where insulation has shifted, particularly at wall-to-roof junctions where thermal bridging can create cold spots [10][11]. Inside the home, a temperature difference of 2–3°C between the walls and the centre of a room can indicate insufficient insulation [9].
External walls are another major source of heat loss, accounting for over a third of total heat escape in UK homes [8]. Surveyors determine whether the walls are solid (common in pre-1920 buildings) or cavity construction (typical between 1920 and 1990) to identify the best insulation approach. They also examine areas where different materials meet, such as around skirting boards, pipe entries, and service penetrations, as these spots are prone to air leakage [11].
Windows and doors are key focus points too. Single-glazed options lose heat much faster than double or triple-glazed alternatives. Surveyors check for worn or missing draught strips around frames, letterboxes, and keyholes, as these can allow unwanted airflow and reduce energy efficiency.
The efficiency of heating and ventilation systems plays a crucial role in a property's energy performance. Surveyors identify the make and model of boilers or heat pumps to confirm their efficiency ratings [13][6]. They also check for proper heating controls, such as programmers, room thermostats, and Thermostatic Radiator Valves (TRVs). For a heating system to be well-regulated, at least half of the radiators should have TRVs [13]. Hot water cylinders are inspected to ensure they are adequately insulated, and systems older than 15–20 years are flagged, as their efficiency is significantly lower than modern condensing boilers [12].
In 2023, 93% of homes in England had central heating, with condensing-combination boilers making up 55% of systems [3]. However, fuel type also has a major impact: homes using mains gas achieve an average SAP rating of 69.1, while oil-heated properties score just 51.7 [14]. Surveyors also assess ventilation, as overly sealed modern homes can struggle with poor air quality and moisture issues if airflow is inadequate.
Energy surveyors use specialised tools to translate heat loss and air leakage into measurable data, identifying areas where energy efficiency can improve. These tools go beyond simple visual inspections, offering a deeper understanding of a building's energy performance.
Thermal cameras are designed to detect infrared radiation, creating a thermogram that visually represents temperature differences. Warmer areas appear in reds, oranges, and yellows, while cooler spots show as blues, greens, and purples. This technology helps uncover issues such as missing insulation, thermal bridging (where heat escapes through structural elements), air leaks, dampness, overheating electrical components, or even leaking underfloor pipes [15][17].
For accurate results, heating should run for 3–4 hours to ensure an indoor-outdoor temperature difference of at least 10°C [17][18]. External surveys are best performed at night or early morning to avoid "solar loading", where sunlight heats the building's surface, masking thermal irregularities [18][19]. High-resolution cameras (minimum 320 x 240 pixels) are essential for precise external inspections [16][18]. These detailed images guide targeted repairs and improvements.
"Building thermography is completely non-invasive and comparatively quick. It enables swift and efficient inspections of, for example, a roof surface that may not be safe to stand on." - Richard Bedford, Managing Director, Richard Bedford Surveying Ltd [16]
Entry-level thermal cameras start at around £650, but professional-grade models for formal surveys can cost over £2,000 [16]. Surveyors also need proper training, with basic courses priced at about £400 and advanced certifications exceeding £1,700 [16].
Blower door tests assess a building's airtightness by using a calibrated fan installed in an exterior doorway. The fan creates depressurisation, forcing outside air to enter through gaps, cracks, or other unsealed areas [20][21]. The results are recorded as Air Changes per Hour at 50 Pascals (ACH₅₀) [21].
When paired with thermal imaging, blower door tests make air leaks visible as dark streaks in the thermal camera's viewfinder [15]. This combined approach is highly effective for identifying draughts. In the UK, such tests are often used to meet Building Regulations Part L (Conservation of Fuel and Power) requirements for both new and existing homes [21].
Surveyors use additional equipment to confirm findings and ensure accurate assessments. Damp meters (moisture meters) help determine if cold spots detected by thermal cameras are due to moisture ingress rather than issues like missing insulation [16]. Anemometers and hygrometers are used to check environmental conditions, such as wind speed (below 5m/s) and appropriate temperature and humidity levels, ensuring reliable survey results [18].
Spot radiometers provide quick temperature readings at specific points, while thermal line scanners measure radiant temperature along a defined line [15]. While these tools are useful for quick checks, they lack the detailed visual data provided by full thermal imaging cameras. Together, these instruments support a thorough, non-invasive energy assessment process, offering actionable insights for improving energy efficiency.
Building on earlier discussions about identifying energy inefficiencies, here’s an overview of what actually happens during an energy assessment.
An energy assessment typically lasts between 30 minutes [25] and an hour [24] for an average property. The process starts with the surveyor sketching a basic floor plan to log the room layout and total area [6]. Following this, they carry out a detailed room-by-room inspection, noting the number of heaters, radiators, and windows, as well as the proportion of low-energy lighting in fixed wiring circuits [6][7].
The surveyor also examines the building envelope, assessing the construction type, wall thickness, and brickwork pattern. These details help identify whether insulation has been retrofitted [6]. Access to loft spaces is crucial, as this allows the assessor to measure the insulation’s type and thickness. If loft access is unavailable, "assumed" values based on the property’s age are used, which can negatively affect the energy rating [2]. The surveyor also records the make and model of the boiler, checks the heating controls (like thermostats, programmers, and thermostatic radiator valves), and measures the capacity of the hot water storage tank [6].
During the visit, surveyors collect over 140 data points, which are then fed into Standard Assessment Procedure (SAP) or RdSAP calculation models [2]. They also take photographs of key features - such as boilers, controls, windows, and insulation - to back up their findings in case of an audit [6]. Homeowners are encouraged to provide documentation for non-visible energy-saving measures, such as underfloor or cavity wall insulation, along with FENSA or CERTASS certificates for windows and boiler service records [22][23]. The entire process is strictly visual, as explained below.
Energy assessments are completely non-invasive. Surveyors do not lift carpets, remove floorboards, drill into walls, or open cavities [2]. Loft inspections are limited to visual checks to measure insulation depth and identify the type of party walls present [26]. This ensures the property remains undisturbed while still allowing for detailed data collection.
"The survey usually takes approximately 1 hour on an averaged size property. It is non-intrusive, meaning there will be no disturbance to the fabric of the property." - Excel EPC [24]
Since the assessment relies on visual inspection, any hidden improvements must be supported by certificates or photographic evidence.
Once deficiencies are identified, understanding your energy survey report is key to taking meaningful action. After receiving the assessment, take the time to review the report carefully and use it as a guide to create a clear action plan.
Energy survey reports often use the RICS traffic light system [27], which ranks defects based on their urgency. Here’s how it works:
Most reports focus on the costs and steps needed to bring a property up to at least Band C. This is a key threshold, as it not only boosts resale value but also ensures compliance with rental standards. On average, the cost to achieve Band C is around £7,320, though this varies depending on the property’s age and type [3].
The report will likely include recommendations for "quick wins" - affordable fixes with a big impact. Examples include adding loft insulation (200 mm or more), cavity wall insulation, and draught-proofing [3]. These measures can significantly reduce energy bills. For context, properties in Energy Efficiency Rating (EER) bands E to G have average annual energy costs of £2,662, compared to just £1,081 for homes in bands A to C [4]. These recommendations provide a clear starting point for planning upgrades.
When tackling upgrades, a fabric-first approach is essential. This means prioritising improvements to the building’s fabric - like insulation, draught-proofing, and glazing - before upgrading heating systems [29]. For instance, installing a new boiler without first improving insulation can lead to unnecessary expenses on oversized systems [3].
"A simple mantra is often used: 'build tight, ventilate right'." – RICS Consumer Guide [28]
Begin with cost-effective, impactful measures like LED lighting, thermostatic radiator valves (TRVs), and draught-proofing before moving on to more extensive retrofits [28]. Address any structural issues - such as cracks, damp, or damp proof course problems - before installing upgrades to avoid exacerbating existing issues [27] [29]. For older properties, especially those built before 1919, upgrades can be more expensive (averaging £10,788 to reach Band C due to solid wall construction). Careful planning is crucial to keep costs manageable [3].
A Medium-Term Plan can help you phase improvements over 20–30 years, ensuring that early upgrades don’t complicate future plans. For example, if you’re considering solar panels, complete roof insulation first to avoid redundant work later.
To prioritise effectively, use a simple payback test. This involves comparing the installation cost of an upgrade to the annual savings it generates [31]. For example, moving from Band D to Band C typically costs around £6,000 and offers modest savings, while upgrades for lower bands often pay off faster [3] [4].
Check the report’s "Summary of energy performance related features" for items rated one or two stars, as these usually represent the best opportunities for cost-effective improvements [32]. However, keep in mind that EPC recommendations are generated by software and may not always suit your property. Always consult your surveyor to ensure the suggested measures won’t lead to issues like moisture build-up or poor ventilation [29] [30] [32].
Be cautious about potential risks, such as inadequate ventilation or condensation when increasing insulation [27]. Sealing your home through draught-proofing without ensuring proper ventilation can lead to moisture problems, mould, and poor air quality [11] [28]. Overheating is another concern; in 2023, 12% of households reported parts of their homes becoming uncomfortably hot, emphasising the need to address overheating risks during upgrades [3]. A qualified surveyor can help identify these risks and recommend ways to mitigate them effectively.
Once you've identified energy inefficiencies, it's crucial to take action without delay. Start by carefully reviewing your Energy Performance Certificate (EPC) or survey report. Did you know that 27% of EPCs contain errors? [2] Look out for inaccuracies or any features marked as "assumed" (like wall insulation). If you spot something off, contact the assessor immediately to request corrections. This initial step lays the groundwork for upgrades that are both targeted and cost-effective.
For tailored advice, consult a professional energy auditor or an RICS member. As Tim Kenny emphasises:
"It is vital that the surveyor reviews these recommendations to ensure they are actually suitable for the property" [5].
While EPC software collects over 140 data points [2], every property is different - especially older homes with unique construction methods. That’s why professional insight is key to ensuring the recommendations align with your property’s specifics.
Start with quick, low-cost fixes. For instance, swapping to LED bulbs costs around £180 and can save you £45 annually [33]. Draught-proofing doors and windows typically costs £80–£120, offering savings of about £18 per year [1]. These changes require minimal investment and no structural work. Just make sure your home stays well-ventilated to avoid issues like moisture build-up and mould [28].
If you're considering larger upgrades, check out financial support options. Schemes like "Help to Heat", incentives from the Energy Saving Trust, and energy supplier programmes can help offset costs [28]. Landlords should note that the cost cap for meeting Minimum Energy Efficiency Standards is generally £3,500 (including VAT) [1]. Achieving an EPC Band C rating costs around £7,320 on average, but the payoff is clear: homes rated A–C have average annual energy bills of just £1,081, compared to £2,662 for those in bands E to G [3][4].
These steps build on the detailed survey process discussed earlier. Acting promptly not only lowers your energy bills but also boosts your property's value. With over half of UK homes now rated A–C [3], energy efficiency has become a key factor in property desirability. Whether you're a homeowner aiming to save money or a landlord working to meet legal standards, your survey offers a clear path to a more efficient and comfortable property.
For expert guidance and access to impartial surveys, consider reaching out to Survey Merchant. They can connect you with a trusted network of experienced surveyors across the country.
The best way to spot energy inefficiencies in your home is with thermal imaging cameras. These clever devices detect heat loss and create heat maps that reveal problem areas like poor insulation or air leaks - things you wouldn't normally see. By identifying these issues, homeowners can focus on specific fixes, cutting down on energy waste and saving money on utility bills.
Another helpful approach is a professional home survey. Surveyors take a closer look at things like wall construction, window types, and insulation levels. They often measure U-values, which show how well your home holds onto heat. On top of that, an Energy Performance Certificate (EPC) provides an overall energy efficiency rating along with practical suggestions for improvement. Combining these tools gives you a clear picture of your home's energy performance, making it easier to decide on upgrades that can boost efficiency.
Upgrading your property to an EPC Band C rating isn't just good for the environment - it can also save you money. A better energy efficiency rating means lower energy bills, especially during those chilly winter months when heating costs can skyrocket. Simply put, it makes your home cheaper to run and more comfortable to live in.
But that's not all. A higher EPC rating could also boost your property's market value. In fact, some studies suggest it might increase by as much as 20%. With more buyers looking for energy-efficient homes, this kind of upgrade could pay off both now and when it comes time to sell.
Improving your home's energy efficiency doesn't have to be a hassle or break the bank. Here are some straightforward and affordable ways to cut down on energy use:
Even small changes like these can make a noticeable impact on your energy bills, while also keeping your home snug and comfortable during chilly weather.