Leasehold
May 2, 2026
5 Steps for Soil Contamination Assessment
Five-step UK guide to soil contamination assessment: desk study, targeted sampling, lab testing, risk analysis and reporting for safe land use.
Soil contamination assessments help identify harmful substances like heavy metals, hydrocarbons, asbestos, VOCs, and PFAS, ensuring land is safe for its intended use. In the UK, developers must follow the Land Contamination Risk Management (LCRM) guidance to meet legal requirements and avoid unexpected costs or project delays. The process uses the Source-Pathway-Receptor (S-P-R) model to assess risks and involves five key steps:
These steps ensure risks are managed effectively, safeguarding health and supporting project success.

5-Step Soil Contamination Assessment Process for UK Land Development
The first step in assessing soil contamination is the Preliminary Site Investigation, often called a Phase 1 Desk Study. This initial review helps separate sites with minimal risk from those needing more detailed investigation. The primary aim here is to create an initial Conceptual Site Model (CSM).
Interestingly, about 60% of sites assessed at this stage require further investigation, but only 5% to 6.7% typically need extensive remediation efforts [5]. These findings are crucial for shaping the next steps, including the sampling strategy.
The desktop study focuses on gathering and analysing historical and current data about the site. This includes reviewing historical maps, planning records, geological information, and pollution incident logs to identify past land uses that may have caused contamination [1][3]. For example, sites previously used as gas works, petrol stations, landfills, or military facilities often leave behind potential hazards. Underground structures like storage tanks and pipelines are also flagged during this process.
Investigators examine sources such as historical aerial photographs to identify high-risk areas. If the site has a military history, a UXO (unexploded ordnance) risk assessment is essential. Additionally, utility locations are verified to prevent accidents during later sampling. This research lays the groundwork for the on-site walkover.
The site walkover builds on the findings from the desktop study by physically inspecting the location. This step helps confirm historical data and identify any current risks. During the walkover, investigators assess the site’s current use, look for structures like fuel tanks or chemical drums, and check for visible signs of contamination, such as oil stains or discoloured soil [3]. Vegetation stress or unusual plant growth may also point to soil contamination or ground gases, while remnants of old infrastructure - like pipework or mine workings - are carefully noted [4].
Using drones during the walkover can be especially helpful for accessing hard-to-reach areas. Additionally, the presence of invasive plants like Japanese Knotweed is documented, as these can complicate development and soil management. Observations are thoroughly recorded with annotated photographs, which are included in the Phase 1 report. If the site has a clean history and no apparent risks, it may be cleared without the need for intrusive testing.
Once Phase 1 is complete, the next step is crafting a focused sampling strategy using your Conceptual Site Model (CSM). This strategy outlines where, how deep, and how many samples to collect during the intrusive Phase 2 investigation. The CSM, developed earlier, maps out the connections between potential contaminant sources, pathways, and receptors.
"A conceptual site model is a representation of the characteristics of the site. It shows the possible relationships between contaminants, pathways and receptors. It will form the basis of your initial assessment and all future decisions." - LCRM: Stage 1 risk assessment, GOV.UK [1]
The goal here is to create a plan precise enough to either confirm or rule out the risks flagged during the desk study and site walkover. As Clear Environmental explains: "Phase 1 = Identify Potential Risks. Phase 2 = Confirm or Dismiss Risks with Hard Data" [3]. This means targeting suspected hotspots while also ensuring enough coverage to understand the broader site conditions. A well-designed sampling plan sets the foundation for effective fieldwork and lab analysis.
Use the historical data gathered in Phase 1 to pinpoint areas where contamination is most likely. For instance, if the site housed underground storage tanks, chemical processing areas, or had a history of spills, focus your sampling on those specific spots [1][3]. If the site was once a petrol station, prioritise former fuel pump and tank locations as well as service trenches where contaminants may have spread.
Divide the site into zones based on ground conditions and proposed land use [1]. For example, a residential development might require shallow sampling in garden areas to assess human health risks, while parking lots or commercial zones might focus on deeper contamination. The depth of your samples should align with the type of receptor being assessed: shallow samples for surface contact risks and deeper ones for groundwater or gas migration concerns [1][3].
Don’t overlook observations from the site walkover. Areas with visible surface staining, strong odours, or unusual vegetation dieback are prime candidates for sampling [1]. If the Phase 1 study identified a risk of ground gas - perhaps from made ground or nearby landfills - your plan should include installing monitoring wells. The depth of these wells will depend on the gas source and the building's foundation design. Additionally, for sites with a military history, conduct a UXO (unexploded ordnance) risk assessment before finalising sampling locations [1].
Once your sampling plan is ready, the next step is selecting the right tools for the job.
The choice of sampling equipment depends on the required depth and site conditions. Here’s a breakdown of common tools and their applications:
Table: Typical applications and depths for each method
| Investigation Method | Best Used For | Typical Depths | Equipment Used |
|---|---|---|---|
| Trial Pits | Shallow contamination, visual soil profiling, locating foundations | Up to 4m | Mechanical excavator or hand-dug |
| Window Sampling | Shallow contamination, gas/water well installation, restricted access | 5–6m (up to 10m) | Tracked or towed window sampling rig |
| Cable Percussive | Deeper soils, dense gravels, geotechnical data, groundwater sampling | Up to 30m+ | Cable percussion drilling rig |
| Rotary Drilling | Hard ground, bedrock investigations, deep groundwater wells | Up to 100m+ | Rotary drilling rig (open hole or cored) |
To ensure compliance, your sampling plan should align with BS 10175 standards for contaminated sites and the BS ISO 18400 series for soil quality sampling. Typically, a Phase 2 intrusive site investigation takes 4–6 weeks to complete, depending on the complexity of the site [3].
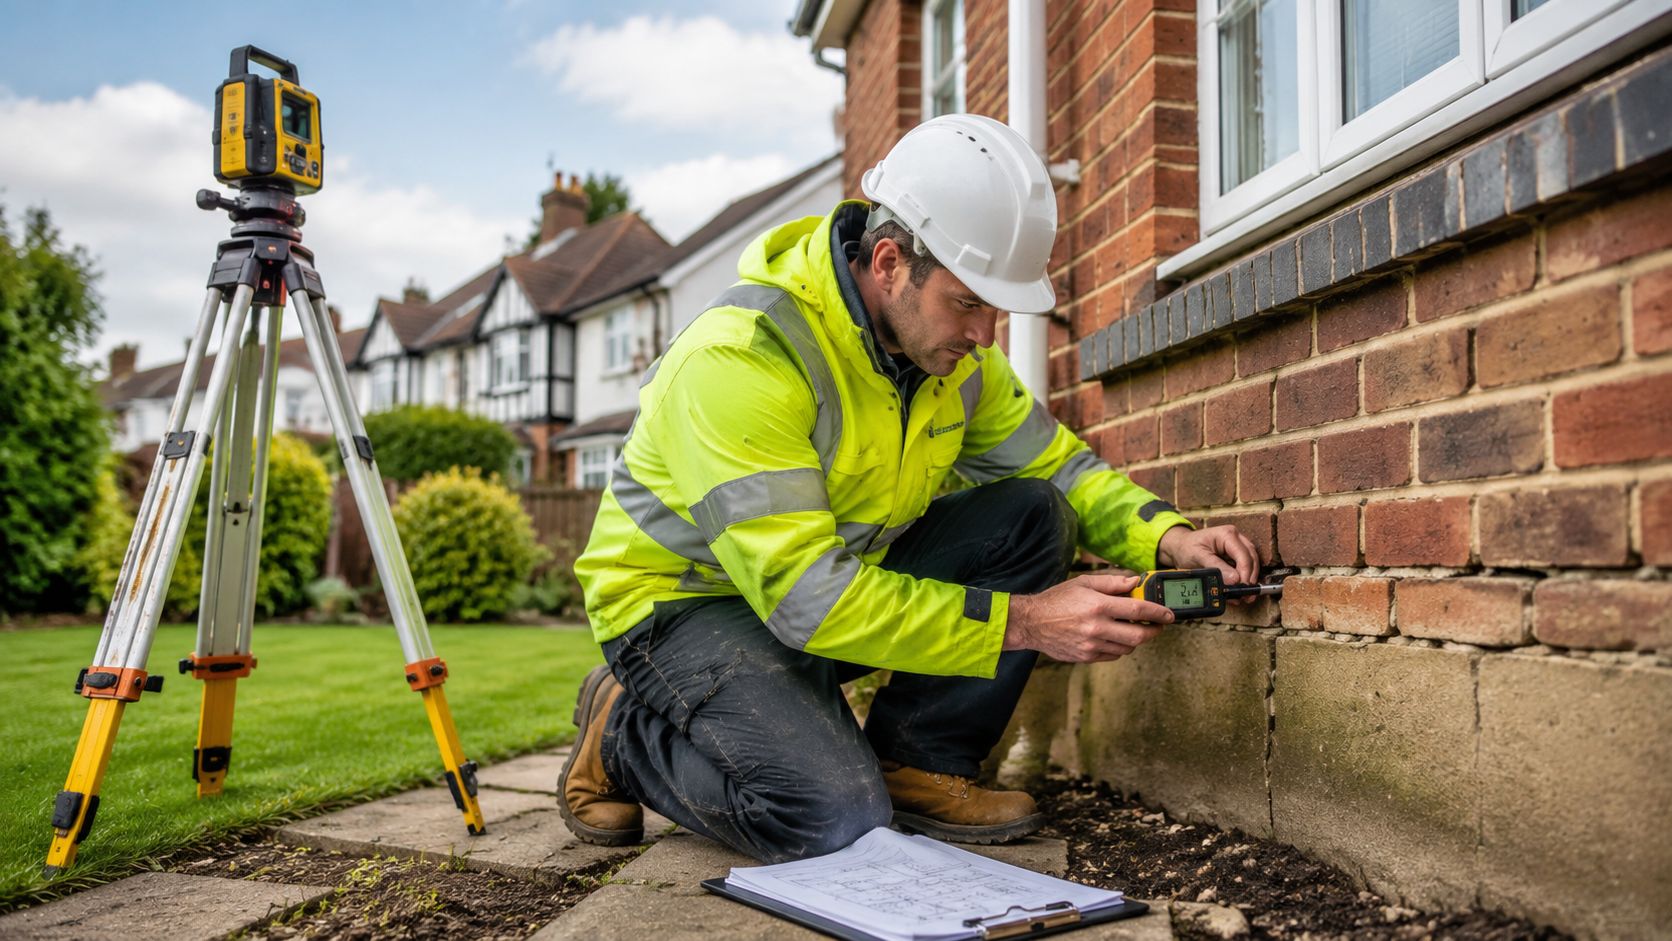
Once your sampling strategy is in place, it’s time to gather on-site evidence. This step translates potential risks into concrete data through detailed fieldwork and laboratory analysis [7]. The accuracy of your contamination assessment hinges on the quality of your samples, so following proper procedures during collection and testing is absolutely crucial.
To ensure reliable results, every sample must be representative, traceable, and free from contamination. Start by thoroughly cleaning your tools - usually stainless steel equipment - with deionised water between working on different soil layers. This prevents cross-contamination during the process [7].
Each sample should be clearly labelled with a unique site ID, depth (measured in metres below ground level, or mbgl), its condition (disturbed or undisturbed), the time of collection, and an environmental seal [7]. Use airtight containers to preserve moisture levels and prevent the loss of volatile organic compounds (VOCs) [7].
It’s also essential to establish a clear chain-of-custody. GPS logging from the point of extraction to the laboratory ensures the sample’s legal defensibility [7]. For brownfield sites, screening for asbestos in soils is critical to comply with the safety requirements set to take effect in 2026 [7]. If surplus soil needs to be removed from the site, Waste Acceptance Criteria (WAC) testing is necessary to avoid misclassification. Mislabelled hazardous waste can cost over £150 per tonne to dispose of, compared to much lower rates for inert materials [3].
Once uncontaminated samples have been secured, accredited laboratory testing is the next step. All chemical analyses must be conducted by laboratories accredited under UKAS (ISO 17025) and the Monitoring Certification Scheme (MCERTS) [6][7]. These certifications ensure that your results meet the stringent technical standards required by the Environment Agency and local planning authorities. Standard testing typically takes 7–10 working days, though expedited 48-hour services are available for tight deadlines [7].
The specific contaminants you test for will depend on the site’s historical use, as outlined in your Conceptual Site Model. For example, former petrol stations often require testing for fuel hydrocarbons (TPH) and BTEX compounds (Benzene, Toluene, Ethylbenzene, Xylene). Industrial sites typically need assessments for heavy metals like Lead, Arsenic, and Cadmium, as well as solvents and VOCs. Sites located near landfills or those with significant made ground may also require ground gas monitoring for Methane and CO2 [1][3]. Additionally, modern investigations increasingly include testing for emerging contaminants like PFAS [3].
When the results are in, compare them against Soil Guideline Values (SGVs) or Category 4 Screening Levels (C4SLs) to determine whether remediation is required [1]. As Pete Thomas, CEO of The Testing Lab PLC, highlights:
"Soil analysis for construction acts as the primary safeguard against subsidence, which remains a leading cause of domestic property insurance claims in the UK" [7].
The data gathered here will play a critical role in shaping your risk assessment in Step 4.
The next step involves analysing laboratory results to evaluate whether contamination poses risks to human health, water sources, ecosystems, or property. This process uses a tiered approach, beginning with a Generic Quantitative Risk Assessment (GQRA) based on standard criteria. If more precise analysis is necessary, it progresses to a Detailed Quantitative Risk Assessment (DQRA), incorporating site-specific modelling [1].
At the heart of risk interpretation lies the Source-Pathway-Receptor (S-P-R) model. As the Environment Agency explains:
"A contaminant linkage must be present for there to be a S-P-R relationship. Without a linkage, there is not a risk – even if a contaminant is present" [1].
The first step is to measure results against Generic Assessment Criteria (GAC). For human health, this often involves using Category 4 Screening Levels (C4SLs) or Soil Guideline Values (SGVs) [1]. C4SLs help determine if land use aligns with Part 2A of the Environmental Protection Act 1990 [8]. However, some SGVs are no longer valid due to updated health risk data, so always ensure you’re using the latest guidance [1][9].
The criteria you select should align with the intended land use. For example, residential areas require stricter thresholds than industrial sites [1]. For water-related risks, results are compared against Drinking Water Standards (DWS) or Environmental Quality Standards (EQS), depending on whether the concern involves groundwater used for drinking or surface water ecosystems [1]. Ground gas risks, such as methane or CO2, are assessed using flow rates and concentrations to assign a Characteristic Situation (CS) classification. This determines the necessary protection measures under BS 8485 and CIRIA C665 [3].
These comparisons guide the decision on whether further action, such as an Options Appraisal, is needed.
If screening levels are exceeded, further assessment or remediation may be required [1]. The key question is whether a complete pollutant linkage exists. For example, if elevated arsenic levels are found, but the site will be capped with hardstanding, preventing human contact, the risk may be deemed acceptable without remediation.
When risks are unacceptable, the next step involves an Options Appraisal to identify the most effective remediation strategy. As Groundsure notes:
"The breaking of the 'pollutant linkage' so that the pollutant cannot cause harm" [2].
This could involve removing the contamination source, interrupting the pathway (e.g., installing barrier membranes), or protecting the receptor. After remediation, the Ministry of Housing, Communities and Local Government advises:
"As a minimum, land should not be capable of being determined as contaminated land under Part 2A" [8].
Emerging factors like climate change must also be factored into risk assessments. Events such as extreme weather or rising water tables could mobilise contaminants or create new pathways in the future. Engaging with local planning authorities and the Environment Agency early in the process is crucial, especially if the site impacts controlled waters or sensitive ecological areas [1][8].
If risks remain unresolved, proceed with an Options Appraisal and document all findings thoroughly in your investigation report.
Once your risk assessment is complete, the next step is compiling everything into a Detailed Site Investigation Report. This document outlines the contamination status of your site and determines whether the land is fit for its intended purpose or if remediation is required. Essentially, it connects your assessment's findings with actionable steps for site suitability or remediation.
The time needed to prepare this report depends on the complexity of the site, usually taking between 4 and 12 weeks [3]. To ensure your report aligns with legislative and technical standards, consider using the National Quality Mark Scheme (NQMS). This voluntary scheme, backed by organisations like the Environment Agency, Natural Resources Wales, and SEPA, allows a Suitably Qualified Person (SQP) to verify the findings. This verification can boost confidence among regulators and lenders [4].
A good report should have a clear structure and include several essential sections. Begin with an Executive Summary that highlights the key findings. Follow this with sections covering Site History, Environmental Setting, an updated Conceptual Site Model, Sampling Results, and a Quantitative Risk Assessment [1].
The Conceptual Site Model (CSM) is a critical part of your report. It should incorporate updated data from the Phase 2 sampling and laboratory analysis. As more data becomes available from intrusive sampling, the CSM should be refined to minimise uncertainties.
It’s also important to document any uncertainties or limitations, such as areas that couldn’t be accessed or gaps in the modelling. Clearly explain the potential consequences of these uncertainties [4]. This level of transparency helps with regulatory approval and reflects professional diligence.
Your recommendations should directly address the contamination challenges identified and be tailored to the intended land use. They should rely on the findings from the Source-Pathway-Receptor model [1][10]. For instance, stricter cleanup levels are required for residential developments with gardens compared to commercial sites due to the sensitivity of receptors. If assessment criteria are exceeded, your report should specify whether further detailed assessment is needed or if it’s time to move on to an Options Appraisal for remediation [1].
If remediation is required, your recommendations should align with the Land Contamination Risk Management (LCRM) framework. Provide a scientific and technical justification for the chosen remediation technology, including its effectiveness, durability, and any limitations [10]. Include a Verification Plan outlining the data and evidence needed to confirm the remediation has successfully reduced risks. As GOV.UK explains:
"Verification demonstrates that the risk has been reduced and that the remediation objectives and criteria have been met" [10].
Additionally, address the broader impacts of remediation. Show that the benefits outweigh any environmental, social, or economic costs [10][4]. Consider climate change in your recommendations, discussing how factors like extreme weather or fluctuating groundwater levels could affect long-term outcomes [10][4]. Lastly, engage with regulators and local residents early on to address concerns about noise, dust, or traffic before finalising the report [10].

When it comes to soil contamination assessments, having specialised expertise is non-negotiable. Survey Merchant offers access to a team of experts who conduct Phase 1 Preliminary Risk Assessments in line with the LCRM framework. These fixed-cost services not only ensure accuracy but also provide developers with the reassurance of budget predictability.
Survey Merchant takes pride in connecting clients with professionals whose qualifications meet the standards outlined in the NPPF. This includes access to highly skilled individuals such as Specialists in Land Condition (SiLC) and Suitably Qualified Persons (SQP) [4]. As Danny Fisher, Principal Consultant at Adeptus Environmental, puts it:
"The skill and experience of your risk assessor is crucial in deriving a judgement on the overall level of risk potentially presented" [11].
This level of expertise is vital for creating an accurate Conceptual Site Model (CSM). A CSM maps out pollutant linkages - covering sources, pathways, and receptors - tailored to the specific proposed use of your site [3][2].
Commissioning a Phase 1 assessment early in the development process can help identify abnormal costs and avoid unexpected liabilities [3][12]. In some cases, a well-drafted Phase 1 report may determine that risks are negligible, which could allow planning conditions to be discharged without the need for expensive Phase 2 intrusive investigations [12]. This streamlined approach makes the transition from initial risk screening to more detailed contamination analysis smoother and more efficient.
Additionally, Survey Merchant adheres to the National Quality Mark Scheme (NQMS), a voluntary initiative supported by the Environment Agency, SEPA, and Natural Resources Wales [4]. Using NQMS-compliant reports can save both time and money by ensuring assessments are accurate and thorough from the outset - essentially, "getting it right first time" [4].
Assessing soil contamination plays a crucial role in protecting human health, safeguarding the environment, and ensuring the commercial viability of land development. By following the LCRM framework, stakeholders can navigate the process effectively [2][4]. This guide's structured five-step approach offers a clear path from initial evaluation to final remediation decisions.
Starting with qualitative assessments and progressing to detailed quantitative sampling helps developers manage risks and avoid unexpected costs. For instance, the 2022 brownfield register revealed the potential for 1.2 million homes to be built on brownfield sites across England [13]. This highlights how thorough contamination assessments can unlock land for development, addressing safety concerns while enabling progress.
Each step in this phased approach strengthens the overall process, ensuring that risks are properly evaluated. This gives developers, lenders, and regulators confidence that sites are genuinely "suitable for use" [4][3]. As the Environment Agency explains:
Using the NQMS [National Quality Mark Scheme]... can result in cost and time savings by 'getting it right first time' [4].
To achieve compliance with the National Planning Policy Framework and meet the requirements of Part 2A of the Environmental Protection Act 1990, it’s essential to involve qualified professionals early. This ensures pollutant linkages are addressed before they escalate into liabilities [13][4]. Whether dealing with a former industrial site or a greenfield area with historical concerns, expert guidance transforms contamination assessment into a manageable and predictable process.
A well-executed assessment not only protects your budget but also safeguards the health of future users, making it a cornerstone of responsible planning.
A Phase 2 intrusive investigation comes into play only if the Phase 1 assessment uncovers potential contamination that warrants deeper analysis. This step involves collecting and testing samples of soil, water, and gas to determine the exact levels of contamination.
However, if the Phase 1 assessment concludes that there are no pollutant linkages or the site is suitable for its intended purpose, a Phase 2 investigation might not be required.
When assessing soil contamination, it's crucial to test for heavy metals such as lead, arsenic, cadmium, and copper - especially in urban or industrial settings. The site’s history plays a key role in determining what else to check for. For instance, areas with industrial or agricultural activity may require testing for hydrocarbons, pesticides, or other industrial chemicals. A targeted approach, guided by the site’s previous uses and potential contamination sources, helps pinpoint specific risks effectively.
When assessing soil contamination in the UK, the process usually begins with a Phase 1 preliminary assessment. This involves desk-based research and site inspections, which can typically take a few weeks to complete.
If further investigation is needed, more detailed studies - such as soil sampling and laboratory analysis - may follow. These additional steps can extend the timeline to several months, depending on the complexity of the site. Since each case is different, it's best to consult a specialist for a more accurate estimate tailored to the specific circumstances.