A landlord opens the front door for what was meant to be a routine visit. The tenant says the flat is fine. Ten minutes later, there is bubbling paint behind a wardrobe, a slow leak under the sink, and no clear record of when the electrics were last checked. That is how avoidable repair costs and legal exposure build up.
A landlord property inspection checklist should do more than confirm whether the place looks presentable. Used properly, it works as a risk-management tool that ties together three jobs at once. It helps you keep on top of legal duties, protect the building fabric, and manage the tenancy with a written record that stands up if there is a dispute over repairs, damage, or access.
In England, electrical safety in the private rented sector requires fixed electrical installations to be inspected and tested at least every five years, with the report shared within the required timeframes under the Electrical Safety Standards in the Private Rented Sector regulations. The Homes (Fitness for Human Habitation) Act 2018 also raised the standard landlords are expected to meet, which makes organised inspection records far more useful if conditions in the property are later challenged.
From a surveyor's point of view, the value is in spotting patterns early. A cracked tile may point to water ingress. Condensation around one window may be a ventilation issue, or it may be the first visible sign of a wider damp problem. Hairline cracking can be harmless settlement, but stepped cracking, distortion, or repeated patch repairs need a more careful reading. Many of the common property survey issues start as small, easy-to-dismiss defects during routine visits.
The practical line is simple. A landlord can carry out a structured visual inspection and keep good records. Once the issue moves into electrics, gas, damp diagnosis, roof defects, structural movement, or anything safety-critical, the checklist should trigger the next step, which is to bring in the right professional rather than guessing. That is what turns an inspection from a quick walkthrough into an asset protection plan.
Table of Contents
- What to check in every room
- Kitchens and bathrooms need closer attention
- Bedrooms and living rooms show how the property is being used
- Write notes that help you act
- Know where a DIY inspection stops
1. 1. The Exterior & Structural Shell
The outside of the building usually tells you where the expensive problems are forming. If rainwater isn't being thrown clear, coverings are loose, or cracks are changing shape, the inside defects you see later are often just symptoms.
A sensible exterior inspection starts from the top and works down. Roof coverings, flashings, parapets, chimneys, gutters, downpipes, masonry, pointing, render, windows, sills, air bricks, paths, and boundary structures all belong on the landlord property inspection checklist. I'd also note whether ground levels are too high against external walls, because bridging damp proof courses is a common and avoidable problem.
Start with what sheds water
Most landlords lose time by looking for decorative damage first. Water management is the priority.
- Roof coverings: Look for slipped tiles, damaged slates, worn flat roof edges, and daylight visible where it shouldn't be.
- Rainwater goods: Check joints, brackets, hopper heads, and discharge points. Overflow staining often tells you more than the gutter itself.
- Walls and openings: Note open joints, cracked render, failed sealant, and decayed window frames.
- Ground drainage: Check gullies, standing water, moss build-up, and whether downpipes connect and discharge properly.
A good trade habit is to compare outside signs with any internal staining. A patch on a first-floor ceiling often has its origin higher and further away than people expect.
What deserves escalation
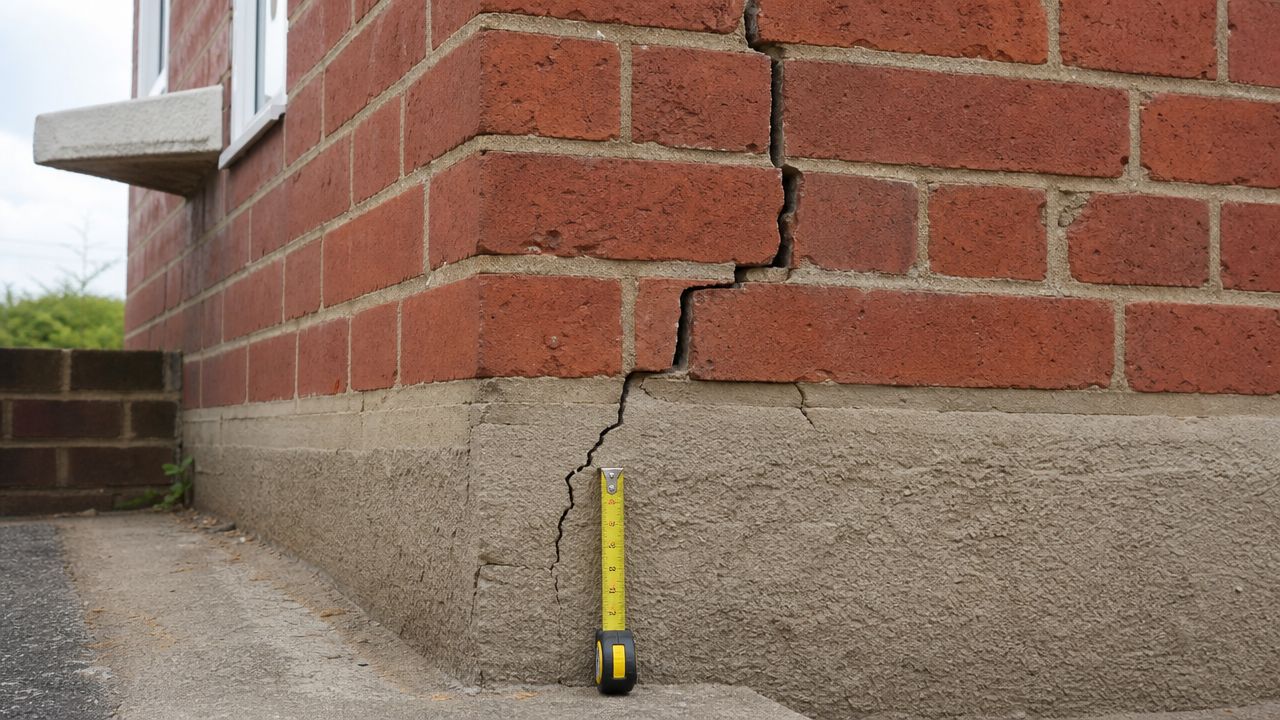
Hairline shrinkage cracking in render isn't the same as stepped cracking through masonry. A loose fence panel isn't the same as a leaning retaining wall. The checklist should separate routine maintenance from matters that need specialist review.
Practical rule: If a crack looks active, water is repeatedly getting in, or a roof element can't be safely viewed from ground level, stop guessing and escalate.
Landlords often see the same common property survey issues repeatedly: damp, roof defects, movement, drainage concerns, and poor previous repairs. The mistake isn't finding them. The mistake is writing “monitor” in the notes and doing nothing until a tenant reports staining, mould, or a leak during bad weather.
3. 3. Interior Room-by-Room Breakdown

A tenant reports a small mould patch behind a wardrobe. Six months later, you are paying for redecoration, extractor upgrades, and plaster repairs. Internal inspections often turn on details that looked minor on the first visit. That is why a room-by-room check should work as a risk management routine, not a quick cleanliness check.
Use the same route every time so your notes stand up at the next inspection. Start at the entrance hall, then move through living areas, kitchen, bathroom, bedrooms, storage spaces, and any safe loft or cellar access. Consistency makes it easier to spot new defects, recurring moisture issues, and wear that points to poor ventilation or misuse rather than normal occupation.
Good records are specific. “Ceiling stain above window head, right-hand corner, dry on inspection” is useful. “Marks on ceiling” is not.
What to check in every room
Each room should be assessed under the same headings so you are comparing like with like.
- Ceilings and walls: Look for cracking, staining, blistered paint, mould growth, patched repairs, and impact damage.
- Floors and coverings: Check for loose boards, damaged laminate, lifted carpet edges, cracked tiles, and trip points.
- Windows and doors: Test opening, closing, locking, restrictors where fitted, glazing condition, draughts, and signs of failed seals.
- Joinery and finishes: Note damaged skirtings, swollen architraves, broken ironmongery, and poor previous repairs.
- Heating and ventilation: Check radiators for leaks or cold spots, confirm vents are clear, and note whether extractor fans are present and working where needed.
- Electrics in plain sight: Record cracked socket fronts, loose switches, scorch marks, or amateur alterations. Leave testing to a qualified electrician.
- Occupation patterns: Excessive condensation, blocked vents, overloaded rooms, and heavy furniture against cold external walls all help explain developing defects.
Kitchens and bathrooms need closer attention
These rooms generate most of the moisture and a large share of the maintenance claims I see. Water escapes slowly at first. Failed sealant at a bath edge, a drip under a sink trap, or a loose shower screen can damage finishes long before a tenant reports a problem.
In kitchens, check worktop joints, sink seals, unit backs, tile grout, flooring around appliances, and extraction. Pull your attention down to plinth level as well. Slow leaks often show there first.
In bathrooms, inspect around the bath, shower tray, WC pan, basin pedestal or vanity, and the ceiling below if there is a room underneath. Condensation staining on cold corners tells a different story from a concentrated leak line. The remedy is different, so the notes need to be different.
Bedrooms and living rooms show how the property is being used
These spaces often reveal the gap between a routine management issue and a building defect. Black mould behind beds or wardrobes on an external wall may point to a ventilation and heating pattern, but it can also expose cold bridging, missing insulation, or penetrating damp. A landlord checklist should record the evidence, not jump straight to the cause.
That is also the point to keep fire risk in view. Check smoke alarms visually, note blocked escape routes, and record unsafe heater use or overloaded extension leads. Survey Merchant's fire risk guide and Restore Heroes' 10-point checklist are useful references for what can be checked during a routine visit without straying into specialist inspection work.
Write notes that help you act
A usable inspection entry has four parts:
- Location: exact room and position
- Condition: what you can see
- Risk: leak risk, safety concern, tenant damage, normal wear, or possible hidden defect
- Action: monitor, repair, instruct contractor, or refer for survey
That format protects the asset and helps with tenant conversations later. If a bathroom extractor has failed, a bedroom wall is repeatedly mould-prone, and the window trickle vents are painted shut, the pattern is clear. You are no longer dealing with isolated cosmetic issues. You are dealing with moisture risk, possible HHSRS concerns, and a problem that needs action before it turns into disrepair or dispute.
Know where a DIY inspection stops
Landlords can inspect visible condition. They should not diagnose every cause from appearance alone.
Escalate when you find recurring damp, cracked tiles over movement, springy floors, staining with no obvious plumbing source, mould that returns after cleaning, or signs that several rooms are affected in the same area of the building. That is usually the point where a surveyor, damp specialist, electrician, or plumber adds value and guesswork starts to cost money.
3. 3. Interior Room-by-Room Breakdown
The room-by-room inspection is where most landlords either create a reliable record or produce a vague one that's hard to use later. “Bedroom fine” is useless. A checklist works when it captures the same elements in the same order every time.
Start at the front door and follow a fixed route. Hall, reception room, kitchen, bathroom, bedrooms, storage, then any loft or cellar access if appropriate. The order matters because consistent sequencing makes comparison easier at the next visit.
Use the same route every time
A structured landlord property inspection checklist should cover finishes, fixtures, services, ventilation, and signs of abnormal occupation or deterioration. That's broader than cleanliness.
Use short observations with location references. “North wall beside radiator, localised staining and slight paint blistering.” That's far better than “damp patch”. In England, that discipline matters because the English Housing Survey summary discussed in this landlord inspection overview reported 8.0 million homes with at least one Category 1 hazard under HHSRS, 4.0 million privately rented homes, and found that 13% of homes had a damp problem in 2023. Those figures are exactly why walls, ceilings, ventilation, bathrooms, kitchens, gutters, and signs of condensation deserve routine attention.
What good room notes look like
For interiors, I'd usually break notes down into surfaces, fittings, moisture indicators, and function.
- Walls and ceilings: Record cracking, staining, blown plaster, mould spotting, and impact damage.
- Floors and joinery: Check loose boards, lifting finishes, damaged skirtings, doors that bind, and failed ironmongery.
- Windows and ventilation: Test opening lights, trickle vents, extract fans, and note condensation patterns.
- Wet areas: Inspect sealant, splashbacks, waste traps, taps, traps under sinks, and signs of slow leaks in cupboards.
A common real-world example is the bathroom that looks acceptable at first glance. Then you open the vanity unit and find swollen chipboard, black spotting around service penetrations, and an extractor clogged with dust. None of that appears in a casual walkthrough.
A room inspection should answer two questions. What condition is it in today, and what might fail before the next visit?
That second question is where experienced landlords save money. You're not just recording damage. You're spotting the next repair before it becomes urgent.
4. 4. Safety & Compliance Checks
This part of the checklist isn't optional, and it shouldn't be mixed in loosely with decorative observations. Safety and compliance items need their own section with dates, document references, and clear follow-up actions.
Gas sits at the top of that list. In rented homes, gas appliances, flues and pipework must be checked by a Gas Safe registered engineer at least every 12 months, and landlords must keep the record for at least two years, as explained in this guide to proactive rental inspections. A landlord walkthrough doesn't replace that legal check. It should support it by logging appliance condition, visible concerns, and the next due date.
Compliance items that aren't optional
Treat compliance fields as fixed data, not free-text comments.
- Gas safety: Record appliance ID, engineer details, issue date, certificate location, and next due date.
- Electrical safety: Log the latest installation report reference, visible socket damage, consumer unit condition, and any signs of overheating.
- Fire safety items: Check alarms, escape routes, self-closers where relevant, and damaged fire doors or seals.
- Carbon monoxide risk points: Note the location of fuel-burning appliances and whether associated safety measures are present and serviceable.
It's also worth cross-checking practical fire precautions against Survey Merchant's fire risk guide and broader inspection prompts such as Restore Heroes' 10-point checklist. The value isn't in copying another list word for word. It's in making sure your own checklist forces action rather than vague reminders.
Build due dates into the checklist
Many compliance failures happen because documents exist, but nobody tracks renewal dates properly. I've seen portfolios with certificates filed neatly and still out of date because the inspection process didn't include a live “next due” field.
“Compliant last year” is not a compliance system.
A workable checklist has separate boxes for “seen”, “valid”, “expires”, and “action booked”. That simple distinction stops a lot of drift. It also means that when a tenant raises a heating issue in winter, you already know the appliance history, the engineer who last attended, and whether the matter is likely maintenance, user error, or something more serious.
5. 5. Documentation & Photo Evidence
Landlords often put effort into the walkthrough and almost none into the evidence. That weakens the whole exercise. If a defect later leads to a dispute, a repair claim, or an argument over the deposit, your notes need to stand on their own.
The strongest approach is a condition-report workflow rather than a basic tick-box form. Industry tools commonly use room-by-room reports with photo attachments, signatures, and secure storage because the aim is to document pre-existing damage and changes over time, not rely on memory, as described in this rental inspection checklist guidance from TurboTenant. That's the standard landlords should aim for even if they manage only one property.
A checklist without evidence is weak
A robust record should include timestamps, consistent room codes, defect descriptions, and severity grading. Kitchen. Bathroom. Bedroom 2. Loft. Rear elevation. Keep those labels consistent from one inspection to the next.
For inventory and condition reporting, a practical benchmark is the passref guide to check-in inventories. The useful lesson is simple. Photos only help when they're tied to written observations and signed or acknowledged records.
How to photograph defects properly
Don't take one dramatic close-up and call it done. Good evidence needs context.
- Start wide: Show the full room or wall so the defect's position is clear.
- Move closer: Take a mid-range image that shows relationship to windows, radiators, or fittings.
- Finish tight: Capture the specific damage, staining, crack, or failed sealant clearly.
- Add words: Pair each image with a short note stating location, nature of defect, and whether it appears historic, active, or worsening.
A typical example is a chipped worktop edge beside a hob. If you only take a close-up, it could be anywhere. If you take the sequence properly, you can identify the room, the fitting, the extent, and whether the damage was already present.
Evidence point: If someone else reads your report six months later, they should be able to understand the defect without calling you.
That's the critical test. Inspection records should work as independent documents, not reminders to the person who wrote them.
6. 6. Timing & Frequency of Inspections
A landlord property inspection checklist is only useful if you use it to a schedule. Random visits produce patchy records. Predictable inspections produce trend lines. You start to see whether condensation is seasonal, whether cracking is stable, and whether a tenant is reporting issues promptly or living with them too long.
The most practical rhythm is tied to tenancy stages and recurring risk. Move-in, periodic occupied inspections, pre-vacation, and check-out each serve a different purpose. They shouldn't all use exactly the same emphasis, even if the core template remains the same.
Set a rhythm and stick to it
Occupied inspections should be planned in advance and diarised at the same time as compliance deadlines and maintenance reviews. If a roof repair was carried out after the last visit, the next inspection should specifically revisit the internal area previously affected. If mould treatment was done in a bathroom, check whether the underlying ventilation issue was solved.
Landlords frequently struggle to find the right balance. Inspect too infrequently and defects grow unnoticed. Inspect too often and tenants start to feel watched rather than supported. A steady, justifiable pattern works better than either extreme.
When extra inspections make sense
Some properties need closer attention because of age, layout, or defect history.
- Older stock: Period buildings with suspended floors, solid walls, or patched repairs usually need more careful monitoring.
- Recent defect history: If there's been a leak, boiler failure, or recurring mould, schedule a follow-up to confirm resolution.
- Shared occupation: HMOs and buildings with communal parts often show wear faster and need tighter oversight.
- Vacant periods: Empty properties deserve a different inspection lens, especially for heating, water ingress, and security.
A practical example is the flat with a known condensation problem in winter. Don't wait for the next generic inspection. Revisit after ventilation measures are introduced and confirm whether moisture staining, fan use, and window trickle ventilation have changed.
Timing should support decisions. Every visit needs a reason, a record, and an outcome.
7. 7. Effective Tenant Communication
An inspection can be technically sound and still go badly if the communication is poor. Tenants don't object to professionalism. They object to surprise, vagueness, and feeling judged in their own home.

The legal access point matters here. UK landlords generally need to give tenants at least 24 hours' written notice for inspections and can only enter at a reasonable time of day unless the tenancy allows otherwise, as noted in this landlord inspection discussion on notice and evidence. That's not just a courtesy rule. If access is mishandled, the value of the inspection record itself can be undermined.
Good access practice protects the inspection
Written notice should state the date, approximate time, purpose, and expected duration. Keep the language plain. “Routine property inspection and review of any maintenance concerns” is better than something broad or intrusive sounding.
When you arrive, focus on the property, not the tenant's lifestyle. Don't comment on personal taste, possessions, or ordinary lived-in clutter unless it directly affects safety, hygiene, or the condition of the building. That distinction matters.
Language that gets better cooperation
The best inspection conversations are calm and specific.
- Ask open questions: “Have you noticed any leaks, draughts, or problems with extraction?” gets better answers than “Everything okay?”
- Confirm next steps: If you identify a repair, say what happens next and who'll arrange access.
- Avoid blame language: Say “There's mould growth around this reveal that needs investigation” rather than accusing the occupier of causing it.
- Close the loop: Send a brief follow-up summary so the tenant knows what was recorded and what action is planned.
A simple real-world example. If a tenant mentions a musty smell in a bedroom, don't dismiss it because the wall looks dry on the day. Note it, inspect furniture placement, check ventilation, and follow up. Tenants often report symptoms before a landlord sees visible evidence.
Respectful communication usually leads to earlier reporting, smoother access, and better property care. That saves far more trouble than a confrontational inspection style ever does.
8. 8. Knowing When to Call a Surveyor
A checklist is a screening tool, not a diagnostic report. Good landlords understand that difference. You're looking for warning signs, patterns, and defects that need action. You're not trying to become a damp specialist, structural engineer, or roofing surveyor during a routine visit.
This matters more now because recurring damp, staining, cracking, and roof issues are often misread as minor maintenance when they point to larger defects. The Manifestly discussion of rental inspection limits highlights an important gap in many landlord guides: they tell you to inspect roofs, walls, windows, and plumbing, but often underplay when a Level 2 or Level 3 survey, damp report, or roof inspection is the better next step. The same source also notes that scrutiny around damp and mould has sharpened, including changes linked to the Regulator of Social Housing's consumer standards taking effect in April 2024.
A landlord walkthrough has limits
There are some issues a competent visual inspection can flag but not conclude.
- Persistent damp: You can record mould, staining, and odour, but not reliably diagnose all moisture sources without proper investigation.
- Structural movement: You can note crack patterns and distorted openings, but not determine cause or significance with certainty.
- Roof defects: You can see slipped coverings or internal signs of leakage, but not always inspect high-level details safely from ground level.
- Hidden service problems: You can identify symptoms around boilers, electrics, and plumbing, but not certify or fully test them.
When to stop inspecting and start diagnosing
If the same issue returns after repair, the checklist has done its job. It has shown you that a visual maintenance response wasn't enough. That's the moment to move from observation to diagnosis.
A landlord dealing with repeated mould in a bedroom corner might initially improve extraction and remind the tenant about heating and ventilation. If the staining returns, the next step may be a damp inspection, thermal assessment, or broader building survey, not another wipe-down and repaint. If you're unsure which report fits the issue, this guide to choosing the right property survey is a useful starting point.
The most expensive inspection mistake is treating a recurring symptom as if it were the actual defect.
That applies to cracked render that hides movement, fresh paint over historic leaks, and “condensation” that's really defective rainwater disposal or cold bridging. Good landlords don't try to win by guessing. They win by escalating at the right time.
8-Point Landlord Inspection Comparison
| Component | Implementation Complexity 🔄 | Resource Requirements ⚡ | Expected Outcomes 📊 | Ideal Use Cases 💡 | Key Advantages ⭐ |
|---|---|---|---|---|---|
| 1. Exterior & Structural Shell | Moderate–High, requires access and some expertise | Moderate, time, binoculars/ladder, possible contractor costs | Protects asset; reduces risk of major repairs 📊 ⭐⭐⭐ | Pre-purchase surveys, annual/seasonal checks | Prevents costly structural failure; preserves value |
| 2. Communal & Shared Areas | Low–Moderate, routine checks and compliance focus | Low, signage, regular cleaning, minor repairs | Improved safety and tenant satisfaction 📊 ⭐⭐ | HMOs, blocks of flats, multi-occupancy properties | Reduces fire/security risks; improves presentation |
| 3. Interior Room-by-Room Breakdown | Moderate, systematic and detailed | Moderate, time, camera/video, standardised templates | Detailed condition record; inventory basis 📊 ⭐⭐⭐ | Move-in/move-out inspections, inventories | Consistent evidence; speeds reporting and disputes |
| 4. Safety & Compliance Checks | Moderate, regulated processes, legal standards | High, certified engineers, testing, documentation ⚡ | Legal compliance; reduced liability and fines 📊 ⭐⭐⭐⭐ | Every tenancy, pre-tenancy compliance checks | Protects from fines and criminal risk; mandatory checks |
| 5. Documentation & Photo Evidence | Low–Moderate, disciplined recording practice | Low–Moderate, camera/app, time for photos and notes ⚡ | Strong dispute evidence; clear baseline 📊 ⭐⭐⭐ | Check-ins, check-outs, dispute prevention | Timestamped proof; professional, indisputable records |
| 6. Timing & Frequency of Inspections | Low, requires scheduling and consistency | Low, calendar, communication tools | Proactive maintenance; fewer surprises 📊 ⭐⭐ | Ongoing tenancy management, mid-term checks | Early issue detection; better landlord-tenant relations |
| 7. Effective Tenant Communication | Low, process and etiquette driven | Low, templates, time for notices and follow-ups | Better cooperation and fewer complaints 📊 ⭐⭐ | All inspections and repair coordination | Builds trust; creates written records and evidence |
| 8. Knowing When to Call a Surveyor | High, specialist assessment and reporting | High, survey fees, detailed reports, possible testing ⚡ | Accurate diagnosis; cost-effective long-term fixes 📊 ⭐⭐⭐⭐ | Structural concerns, persistent damp, pre-purchase, major works | Prevents misdiagnosis; guides correct remedial action |
From Checklist to Action Protecting Your Investment
A landlord property inspection checklist is most useful when it becomes part of a wider management system. On its own, a form doesn't protect anything. What protects the property is the habit of inspecting consistently, recording accurately, following up quickly, and knowing when a routine note has to become a repair order or a specialist instruction.
That shift in mindset matters. Many landlords still treat inspections as a box-ticking exercise between tenancies or as a way to check whether the place looks tidy. In practice, the stronger approach is to treat each visit as part of an evidence trail and a maintenance strategy. The exterior tells you where water may be entering. Shared areas show whether management standards are slipping. Room-by-room notes reveal developing defects. Compliance records confirm whether legal duties are under control. Photo evidence turns observations into something you can rely on later.
The practical benefit is cumulative. Over time, you build a property history that helps you compare defects, justify repair decisions, and explain what changed between one inspection and the next. That makes routine management easier, but it also matters when something goes wrong. A leak, deposit disagreement, complaint about disrepair, or question over access is much easier to handle when your records are consistent, dated, and supported by photographs.
Tenant relationships usually improve as well when inspections are done properly. Clear written notice, respectful conduct during the visit, and a short follow-up summary all show that the inspection isn't arbitrary. It has a legitimate purpose. Tenants are far more likely to report issues early when they can see that concerns will be taken seriously and documented properly.
There's also a clear line between what a landlord inspection can achieve and what it can't. A visual checklist is excellent for identifying symptoms, risk points, and maintenance failures. It is not a substitute for a proper diagnosis where the signs point to structural movement, recurring damp, hidden roof defects, or building pathology that needs technical investigation. That distinction is one of the most important judgements a landlord can make. Delaying specialist advice usually means paying for the same problem twice.
The best inspection systems are simple enough to repeat and detailed enough to stand up later. Use the same route through the property. Use the same room labels. Record compliance dates in a fixed format. Take photographs in a consistent sequence. Distinguish between cosmetic wear, repair items, and issues requiring urgent escalation. Above all, act on what you find.
If your checklist repeatedly turns up staining, cracking, mould, roof concerns, or defects that don't respond to straightforward maintenance, don't rely on guesswork. Bring in a qualified professional who can investigate the cause properly, explain the significance, and recommend the right remedial path. That's how a checklist stops being paperwork and starts doing the job it's supposed to do. Protecting the asset, reducing avoidable risk, and giving you a clear basis for decisions.
If your inspection has raised concerns about damp, cracks, roofing, condition, or the right level of survey to commission, Survey Merchant can connect you with a suitably qualified UK surveyor from its nationwide panel. Whether you need a Level 2 or Level 3 survey, a defect report, a damp assessment, or specialist advice on your rental property, Survey Merchant helps landlords get impartial guidance matched to the issue rather than a one-size-fits-all answer.